> ## Documentation Index
> Fetch the complete documentation index at: https://help.decodo.com/llms.txt
> Use this file to discover all available pages before exploring further.
# 快速入门
> 专用数据中心代理快速入门
### Decodo 代理使用端点
* 端点就像通往 IP 池的网关。
* 当您连接到端点时,您的流量会**自动**通过 Decodo IP 池中的随机 IP 地址进行路由。
* 数据中心代理使用以下端点和端口进行随机请求:
```text theme={null}
dc.decodo.com:10000
```
* 以下是各种编程语言的一些基本请求示例:
```shellscript cURL theme={null}
curl -U "USERNAME:PASSWORD" -x "dc.decodo.com:10000" "https://ip.decodo.com/json"
```
```python Python theme={null}
import requests
url = 'https://ip.decodo.com/json'
username = 'USERNAME'
password = 'PASSWORD'
proxy = f"http://{username}:{password}@dc.decodo.com:10000"
result = requests.get(url, proxies = {
'http': proxy,
'https': proxy
})
print(result.text)
```
```javascript Node theme={null}
const axios = require('axios');
const { HttpsProxyAgent } = require('https-proxy-agent');
const url = 'https://ip.decodo.com/json';
const proxyAgent = new HttpsProxyAgent(
'http://username:password@dc.decodo.com:10000');
axios
.get(url, {
httpsAgent: proxyAgent,
})
.then((response) => {
console.log(response.data);
});
```
```php PHP theme={null}
### 控制您的连接
* 您可以通过添加参数来控制 IP 选择,使其更加具体。
* 继续阅读以获取有关指定和生成更多示例的分步演练,或查看我们的[**高级参数**](https://help.decodo.com/docs/cn/dedicated-datacenter-advanced-parameters)文章以获得更深入的了解。
***
## 身份验证
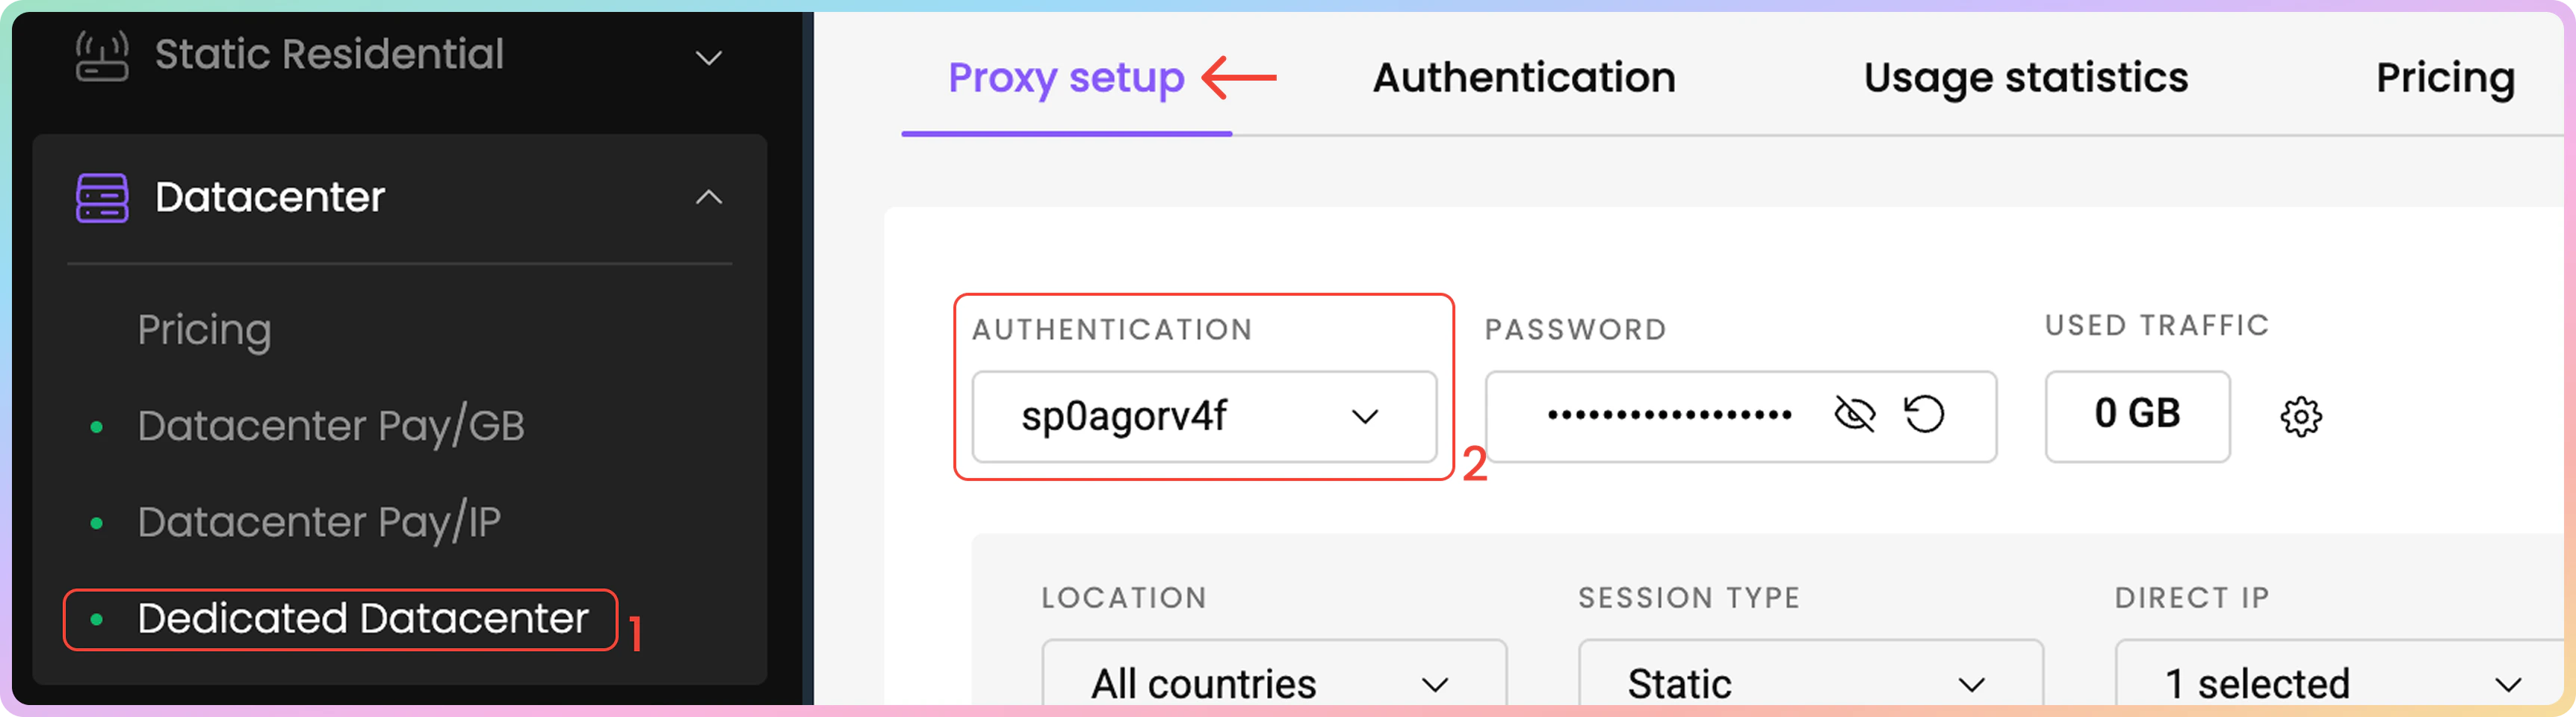
1. 首先,导航到仪表板上的[**数据中心 → 专用数据中心 → 代理设置**](https://dashboard.decodo.com/dedicated-dc-ip-proxies/proxy-setup)页面,并查找身份验证部分。
* 您会看到您的第一个代理用户和密码已自动创建。
2. 接下来,选择您的代理**身份验证方法**。
* 这可以是您的**白名单 IP** 地址或您的一个\_代理用户\_
 ### 其他身份验证选项
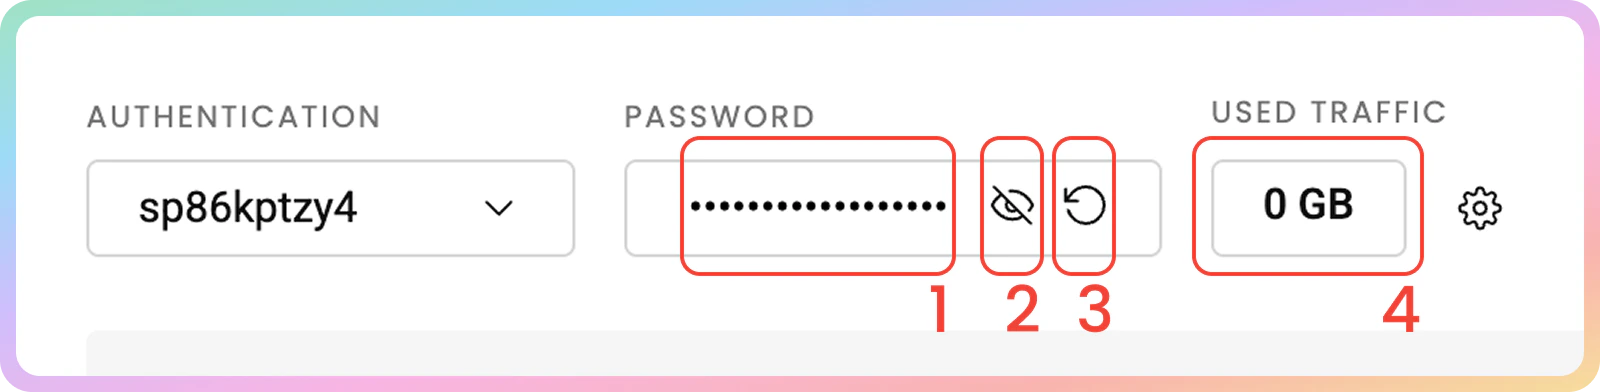
1. 您可以通过点击密码来**复制**它
2. 要查看密码,请点击**眼睛**图标。
3. 您可以通过点击**箭头图标**并选择**确认**来生成新密码。
4. 在这里,您还可以查看每个代理用户的**已用流量**,或检查白名单 IP 的已用流量总和。
* 您可以在**身份验证**选项卡中进一步管理您的凭据。有关更多详细信息,请查看[**身份验证方法**](https://help.decodo.com/docs/cn/dedicated-datacenter-proxy-authentication-methods)文章。
### 其他身份验证选项
1. 您可以通过点击密码来**复制**它
2. 要查看密码,请点击**眼睛**图标。
3. 您可以通过点击**箭头图标**并选择**确认**来生成新密码。
4. 在这里,您还可以查看每个代理用户的**已用流量**,或检查白名单 IP 的已用流量总和。
* 您可以在**身份验证**选项卡中进一步管理您的凭据。有关更多详细信息,请查看[**身份验证方法**](https://help.decodo.com/docs/cn/dedicated-datacenter-proxy-authentication-methods)文章。
 ## 代理设置
在仪表板的专用数据中心代理设置部分,选择各种参数将生成您可以轻松复制到应用程序、工具或代码中的示例。
1. 在[**数据中心 → 专用数据中心 → 代理设置**](https://dashboard.decodo.com/dedicated-dc-ip-proxies/proxy-setup)页面上,在身份验证方法下方找到参数选择部分。
## 代理设置
在仪表板的专用数据中心代理设置部分,选择各种参数将生成您可以轻松复制到应用程序、工具或代码中的示例。
1. 在[**数据中心 → 专用数据中心 → 代理设置**](https://dashboard.decodo.com/dedicated-dc-ip-proxies/proxy-setup)页面上,在身份验证方法下方找到参数选择部分。
 ### 位置
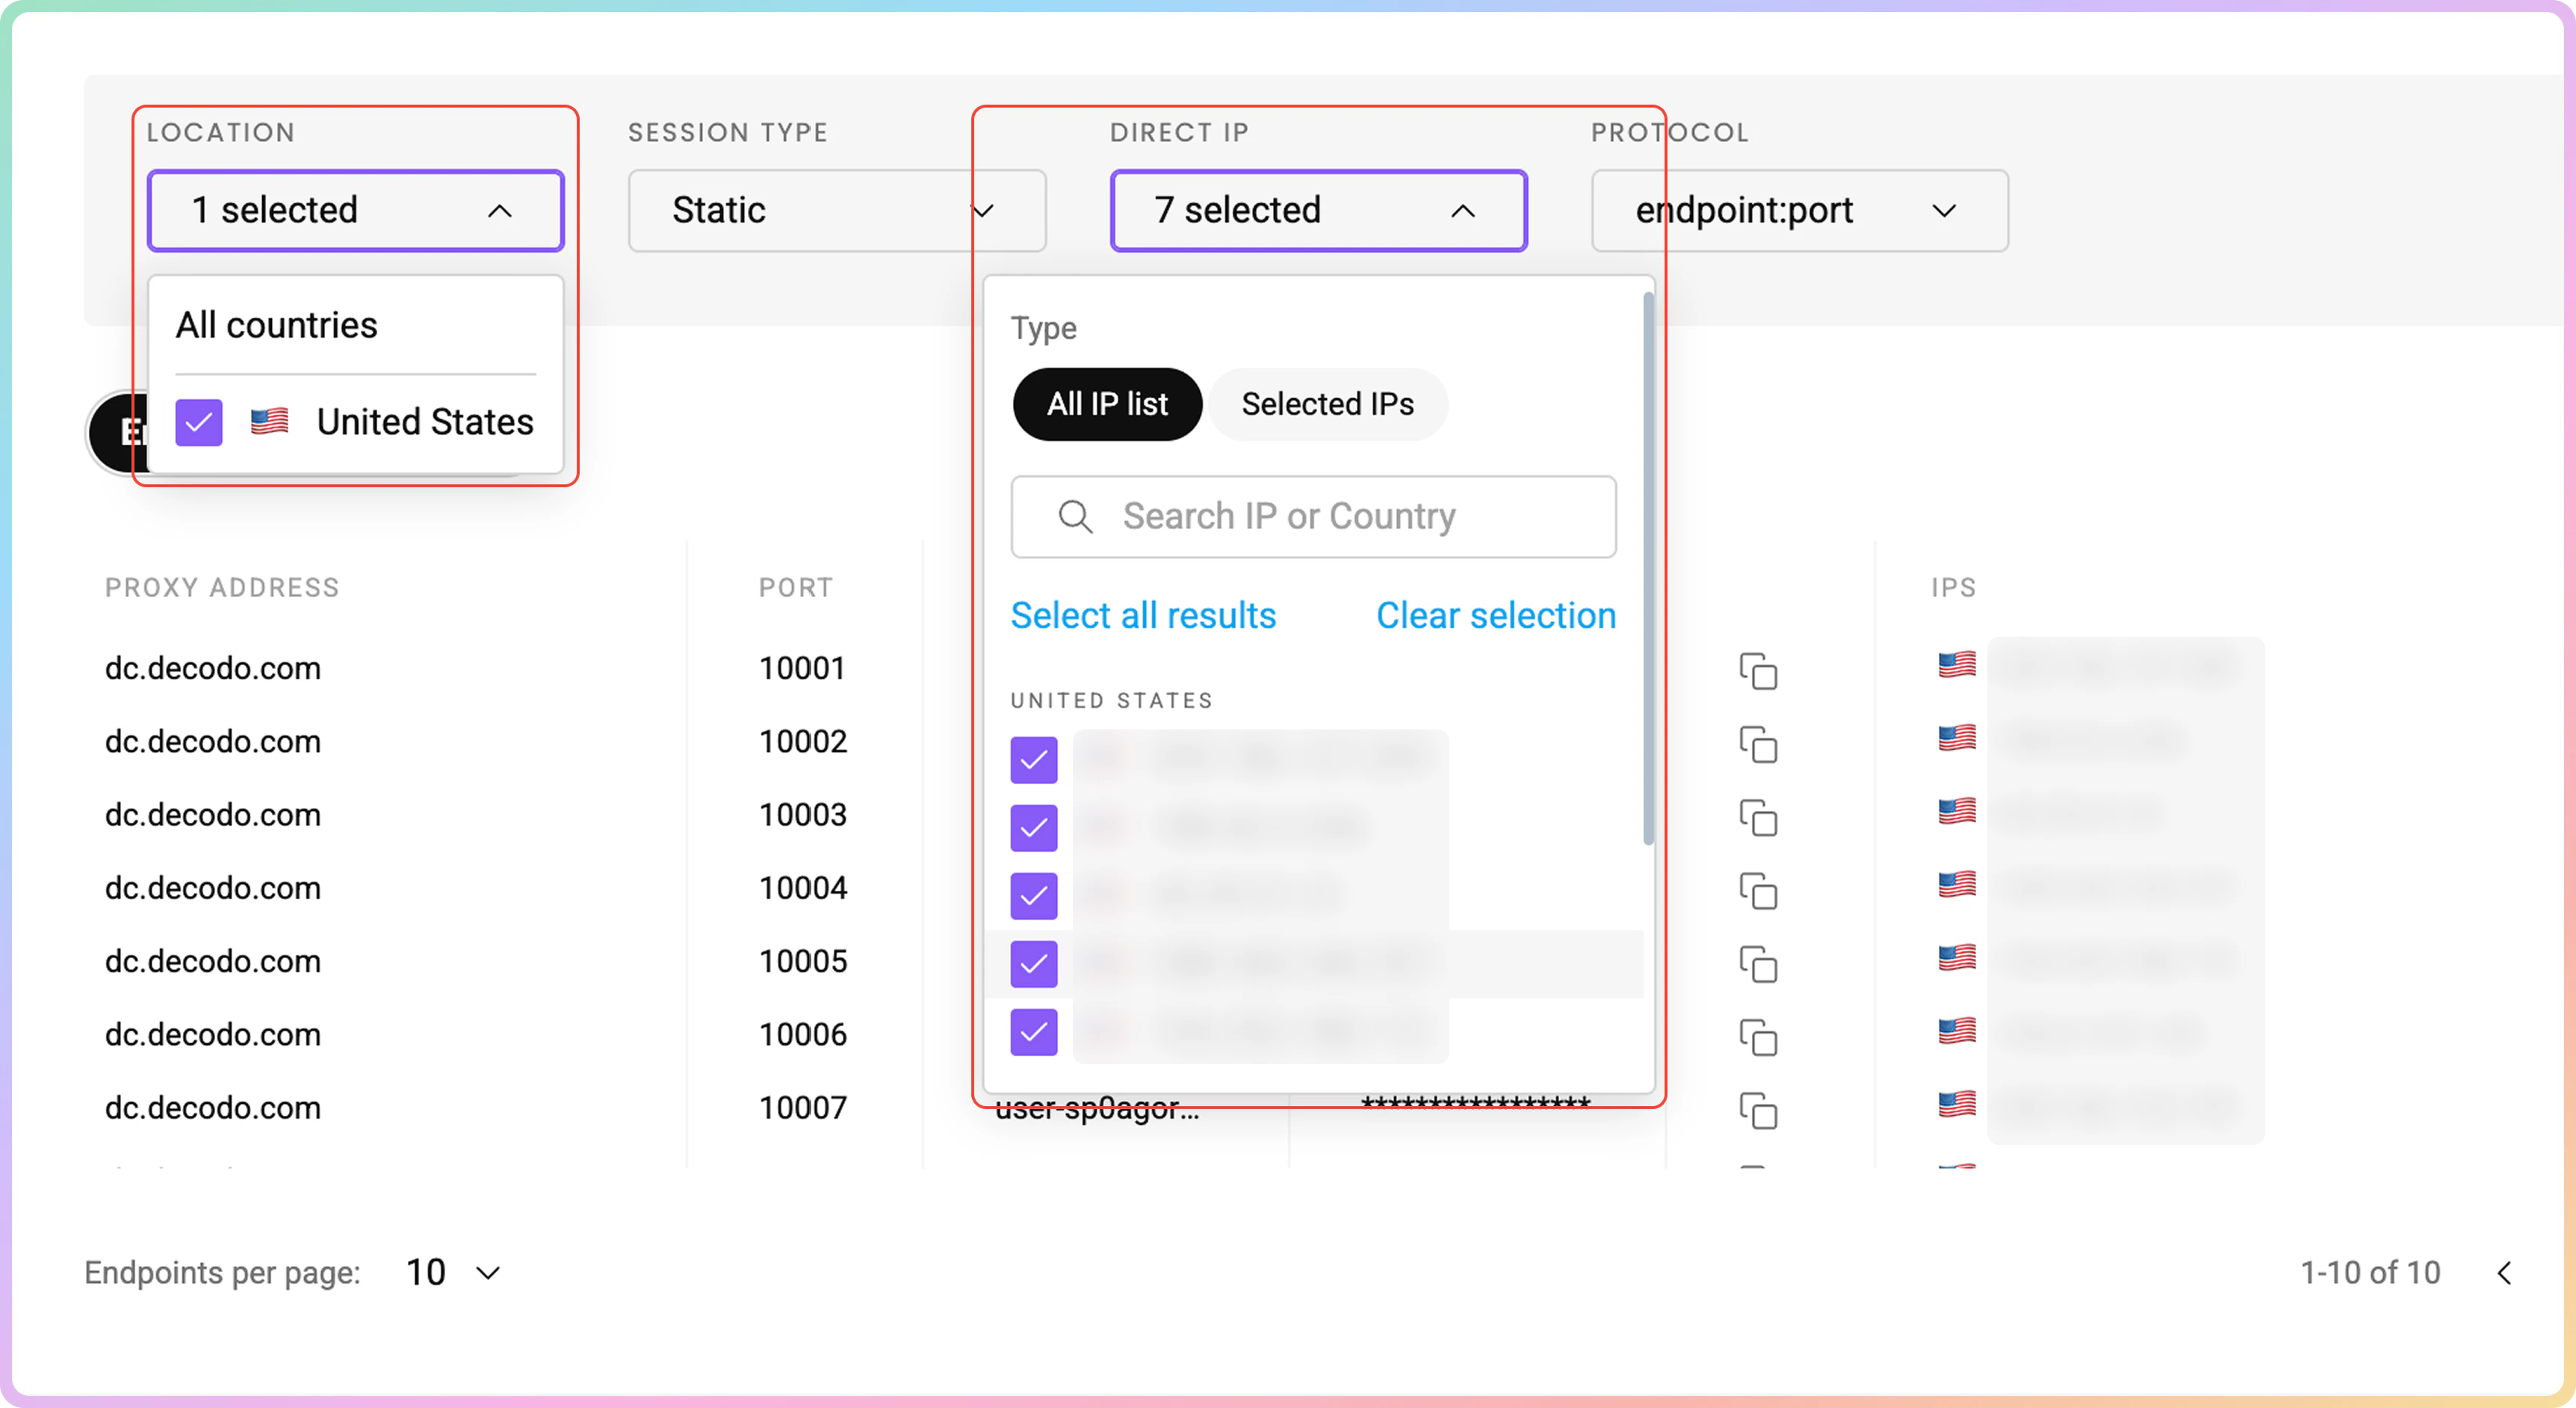
2. 首先,选择代理的[**位置**](https://help.decodo.com/docs/cn/dedicated-datacenter-proxy-available-locations)。
### `直接 IP` 定位
* 您可以通过选择**直接 IP** 选项来**指定要连接的 IP** 作为**参数**。
* 您可以切换 IP、全选或使用搜索字段创建列表。
* IP 选择将限于**位置**下选择的国家(**所有国家**将提供完整列表)。
* 只有在使用 `user:pass` 身份验证方法时才能指定 IP。
### 位置
2. 首先,选择代理的[**位置**](https://help.decodo.com/docs/cn/dedicated-datacenter-proxy-available-locations)。
### `直接 IP` 定位
* 您可以通过选择**直接 IP** 选项来**指定要连接的 IP** 作为**参数**。
* 您可以切换 IP、全选或使用搜索字段创建列表。
* IP 选择将限于**位置**下选择的国家(**所有国家**将提供完整列表)。
* 只有在使用 `user:pass` 身份验证方法时才能指定 IP。
 ### 会话类型
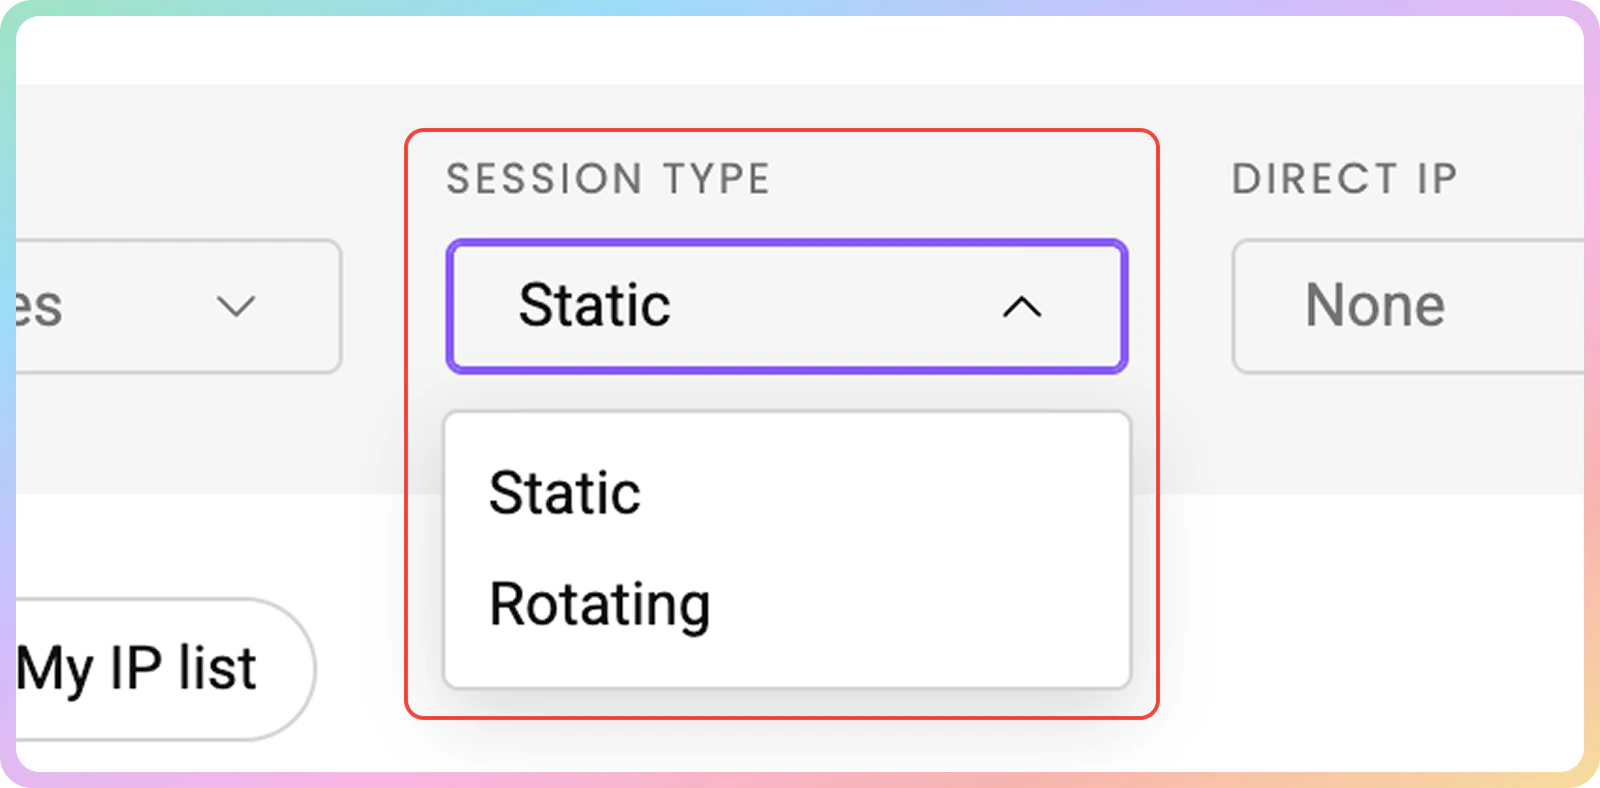
然后,选择您首选的[**会话类型**](https://help.decodo.com/docs/cn/dedicated-datacenter-proxy-session-types),**轮换**或**静态**。
### 会话端口
* **静态** – 端口 `10001`-`63000` 提供静态 IP 地址,该地址将保持不变,直到您决定更改它或会话结束。
* **轮换** – 端口 `10000` 在您发出的每个请求上轮换 IP 地址
### 会话类型
然后,选择您首选的[**会话类型**](https://help.decodo.com/docs/cn/dedicated-datacenter-proxy-session-types),**轮换**或**静态**。
### 会话端口
* **静态** – 端口 `10001`-`63000` 提供静态 IP 地址,该地址将保持不变,直到您决定更改它或会话结束。
* **轮换** – 端口 `10000` 在您发出的每个请求上轮换 IP 地址
 ### 协议
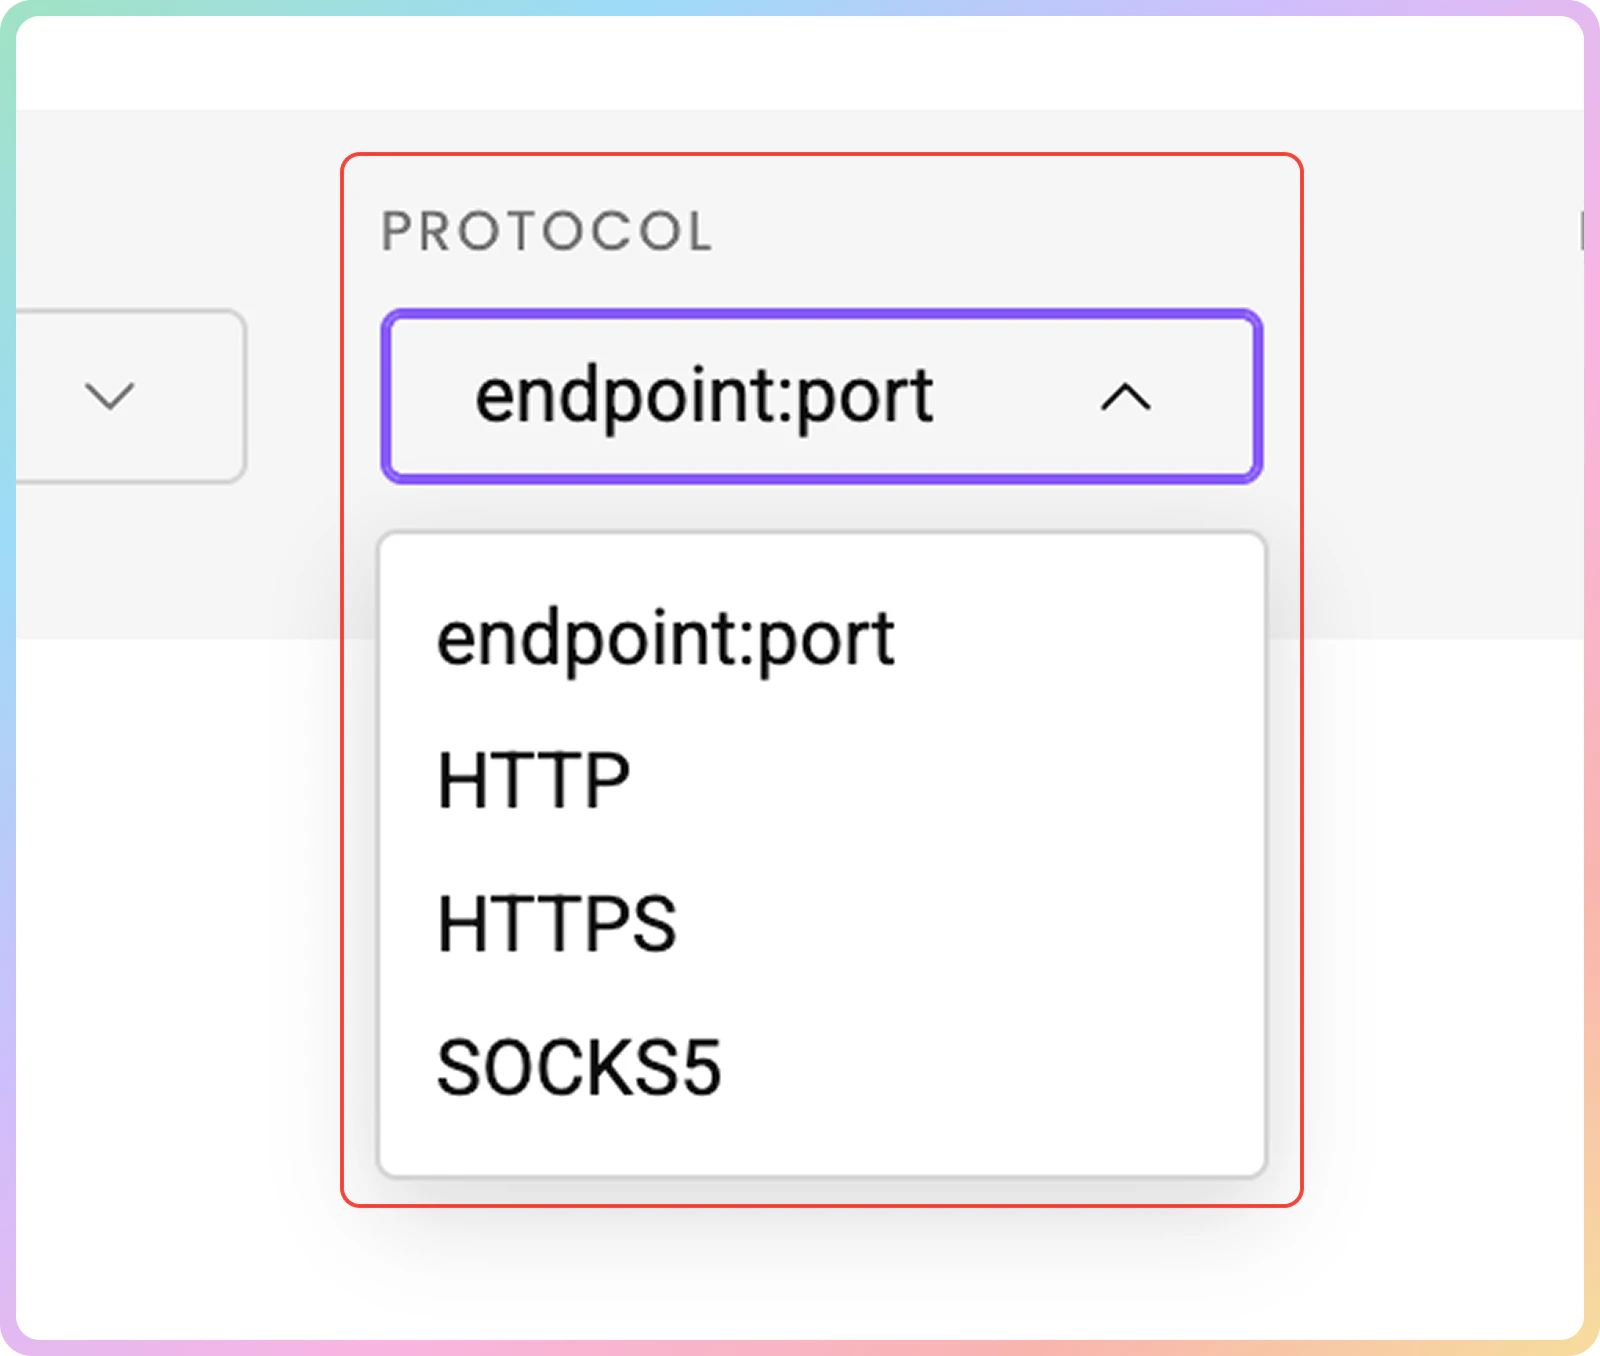
4. 最后,选择[**协议**](https://help.decodo.com/docs/cn/dedicated-datacenter-proxy-protocols)格式。可用选项包括 `Endpoint:port`、`HTTP`、`HTTPS` 和 `SOCKS5`。
### 协议
4. 最后,选择[**协议**](https://help.decodo.com/docs/cn/dedicated-datacenter-proxy-protocols)格式。可用选项包括 `Endpoint:port`、`HTTP`、`HTTPS` 和 `SOCKS5`。
 ## 代理列表示例
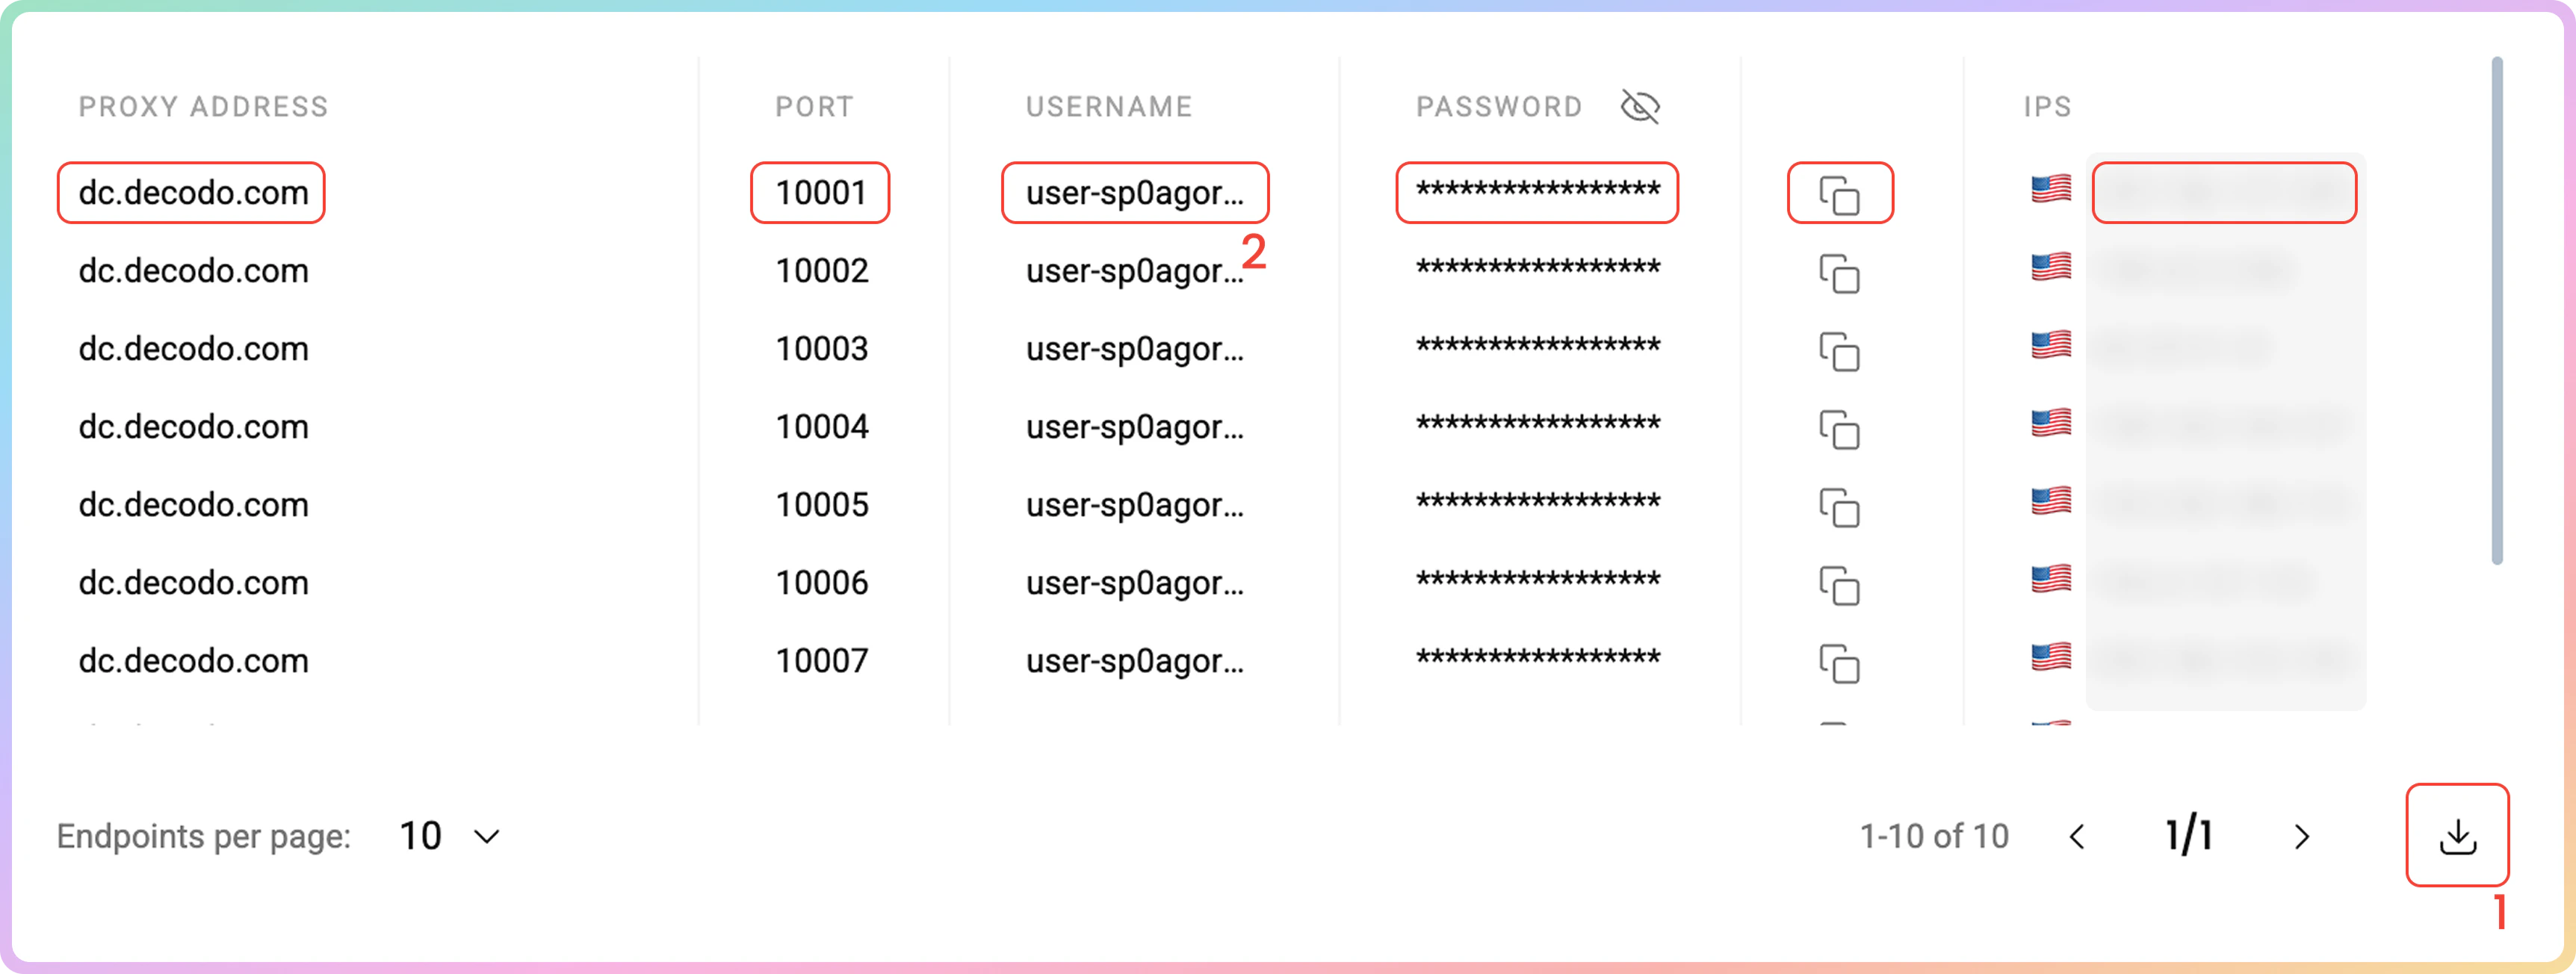
在代理设置部分完成设置后,您将看到根据您的选择生成的端点和端口的**代理列表**。
1. 只需将其**复制**到剪贴板,或**下载**创建的代理列表的 `.csv` 或 `.txt` 文件。
2. 或者,**复制**生成参数的单个元素,例如**代理地址**、**端口**、**用户名**、**密码**和 **IP**,或复制整个示例字符串。
## 代理列表示例
在代理设置部分完成设置后,您将看到根据您的选择生成的端点和端口的**代理列表**。
1. 只需将其**复制**到剪贴板,或**下载**创建的代理列表的 `.csv` 或 `.txt` 文件。
2. 或者,**复制**生成参数的单个元素,例如**代理地址**、**端口**、**用户名**、**密码**和 **IP**,或复制整个示例字符串。
 ### 端点列表控制
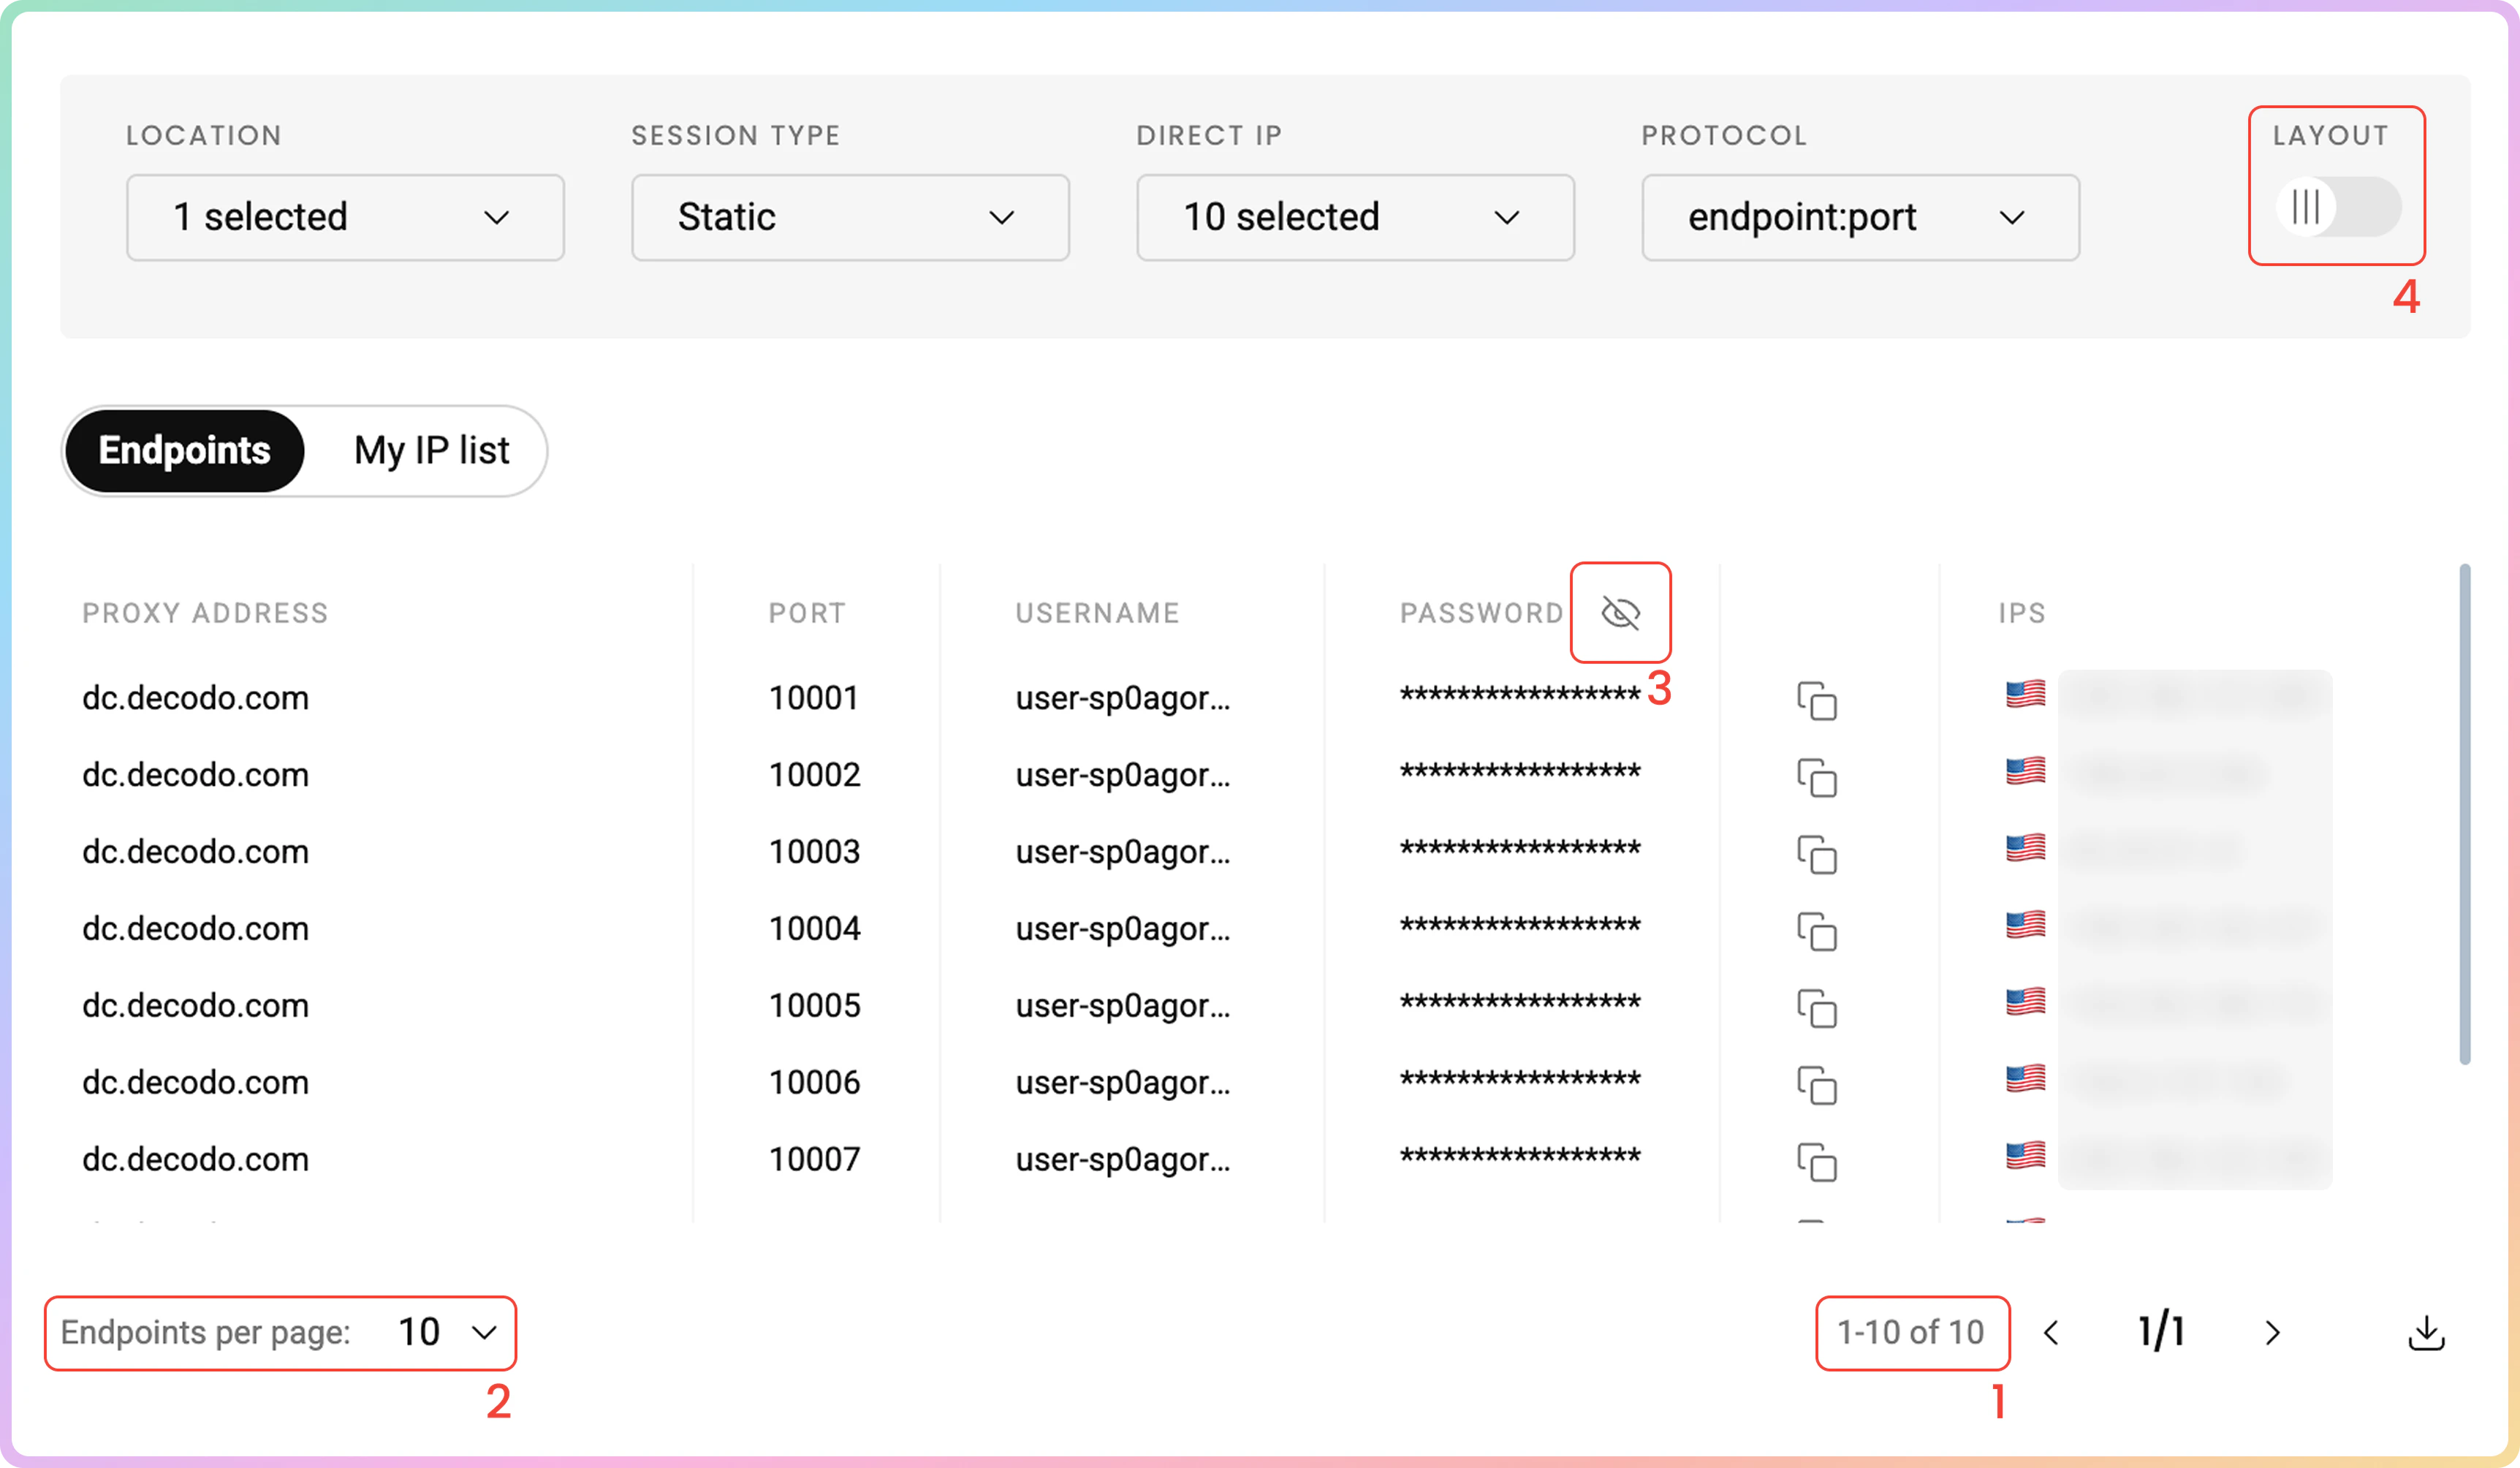
1. 列表中生成的端点数量将取决于您通过计划购买的 IP 数量。
* 如果您仅选择特定的 IP 或国家,生成的端点总数将等于您计划的 IP 数量,但生成的 IP 将**重复以填充列表**。
2. 设置每页显示多少个端点(`10`、`25`、`50` 或 `100`)。
3. 通过点击**眼睛**图标隐藏您的密码。这不会影响复制和粘贴功能。
4. 点击**布局**下右上角的**切换视图**以显示整个参数字符串。
### 端点列表控制
1. 列表中生成的端点数量将取决于您通过计划购买的 IP 数量。
* 如果您仅选择特定的 IP 或国家,生成的端点总数将等于您计划的 IP 数量,但生成的 IP 将**重复以填充列表**。
2. 设置每页显示多少个端点(`10`、`25`、`50` 或 `100`)。
3. 通过点击**眼睛**图标隐藏您的密码。这不会影响复制和粘贴功能。
4. 点击**布局**下右上角的**切换视图**以显示整个参数字符串。
 有关**管理** **IP 列表**的信息,请参阅专用数据中心[**IP 列表管理**](https://help.decodo.com/docs/cn/dedicated-datacenter-proxy-ip-list-management)文章。
## 代码示例
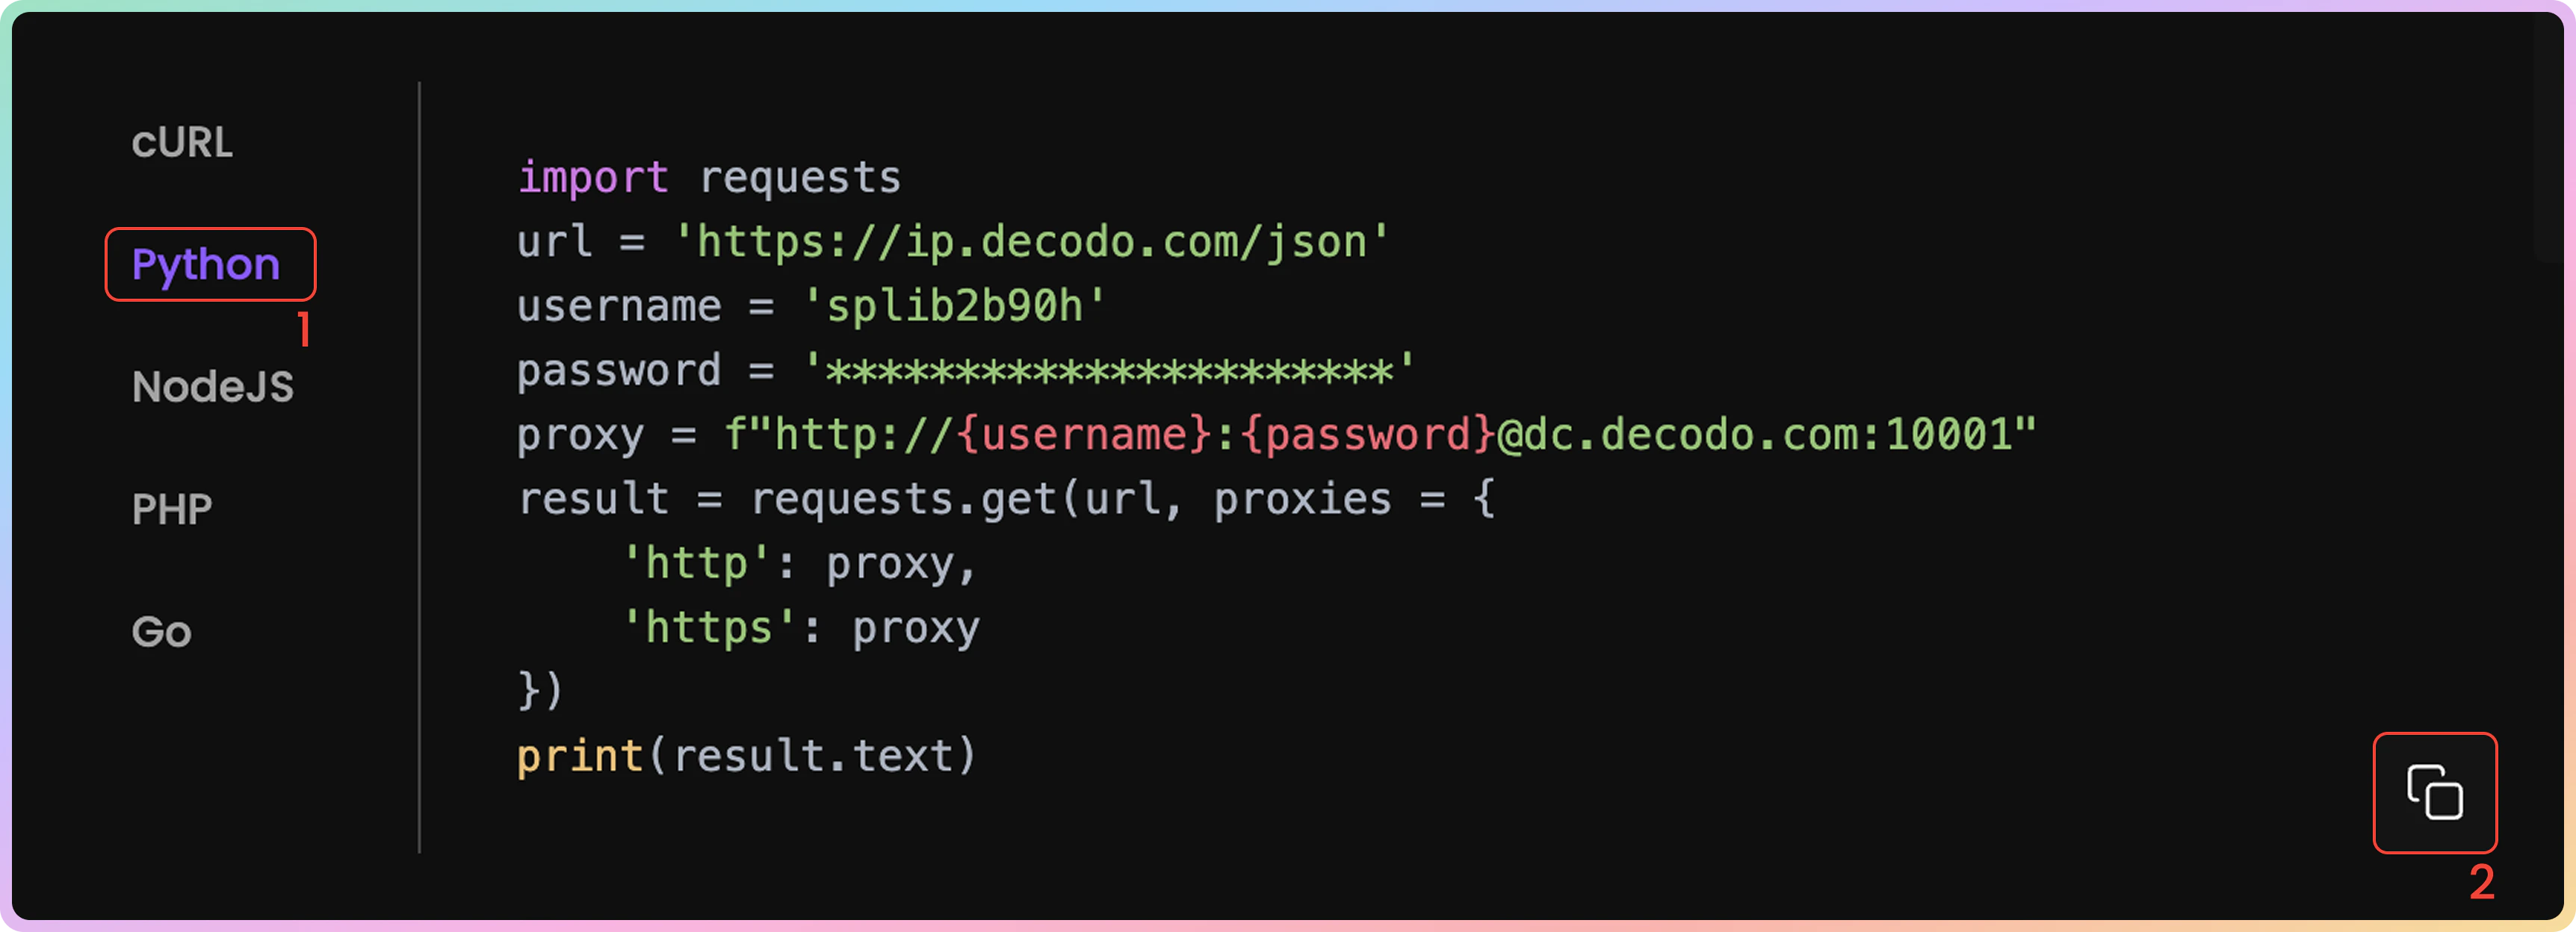
在项目中使用代理之前,确认代理是否正常运行非常重要。根据您之前在代理设置仪表板底部的选择生成的**代码示例**允许您快速测试代理是否正确连接并显示您的新 IP 地址。
1. 您可以选择任何可用的语言:`cURL`、`Python`、`NodeJS`、`PHP` 或 `GO`。
2. 通过点击右下角的**复制**来复制预配置的代码示例。
3. 将代码粘贴并在您的环境中运行。
4. 响应将显示代理 IP 地址和位置信息,确认您的代理正常工作。
* 如果您在响应中看到代理的 IP 地址(而不是您的实际 IP),恭喜!您的代理已成功配置并可以使用。
有关**管理** **IP 列表**的信息,请参阅专用数据中心[**IP 列表管理**](https://help.decodo.com/docs/cn/dedicated-datacenter-proxy-ip-list-management)文章。
## 代码示例
在项目中使用代理之前,确认代理是否正常运行非常重要。根据您之前在代理设置仪表板底部的选择生成的**代码示例**允许您快速测试代理是否正确连接并显示您的新 IP 地址。
1. 您可以选择任何可用的语言:`cURL`、`Python`、`NodeJS`、`PHP` 或 `GO`。
2. 通过点击右下角的**复制**来复制预配置的代码示例。
3. 将代码粘贴并在您的环境中运行。
4. 响应将显示代理 IP 地址和位置信息,确认您的代理正常工作。
* 如果您在响应中看到代理的 IP 地址(而不是您的实际 IP),恭喜!您的代理已成功配置并可以使用。
 ## 集成指南
生成端点和端口后,您可以将它们应用于任何应用程序或工具,立即开始使用代理。
### Decodo 工具
* 或者,您可以使用适用于 [**Chrome**](https://help.decodo.com/docs/cn/decodo-chrome-extension#/) 或 [**Firefox**](https://help.decodo.com/docs/cn/decodo-firefox-extension#/) 的 **Decodo 扩展**。
### 集成指南
* 在[**集成概述**](https://help.decodo.com/docs/cn/proxy-integrations-overview)部分查看最受欢迎的第三方工具指南。
### GitHub
* 有关任何**高级代码示例**和**中间件**,请访问我们的 [**GitHub**](https://github.com/decodo/decodo) 页面。
## 统计
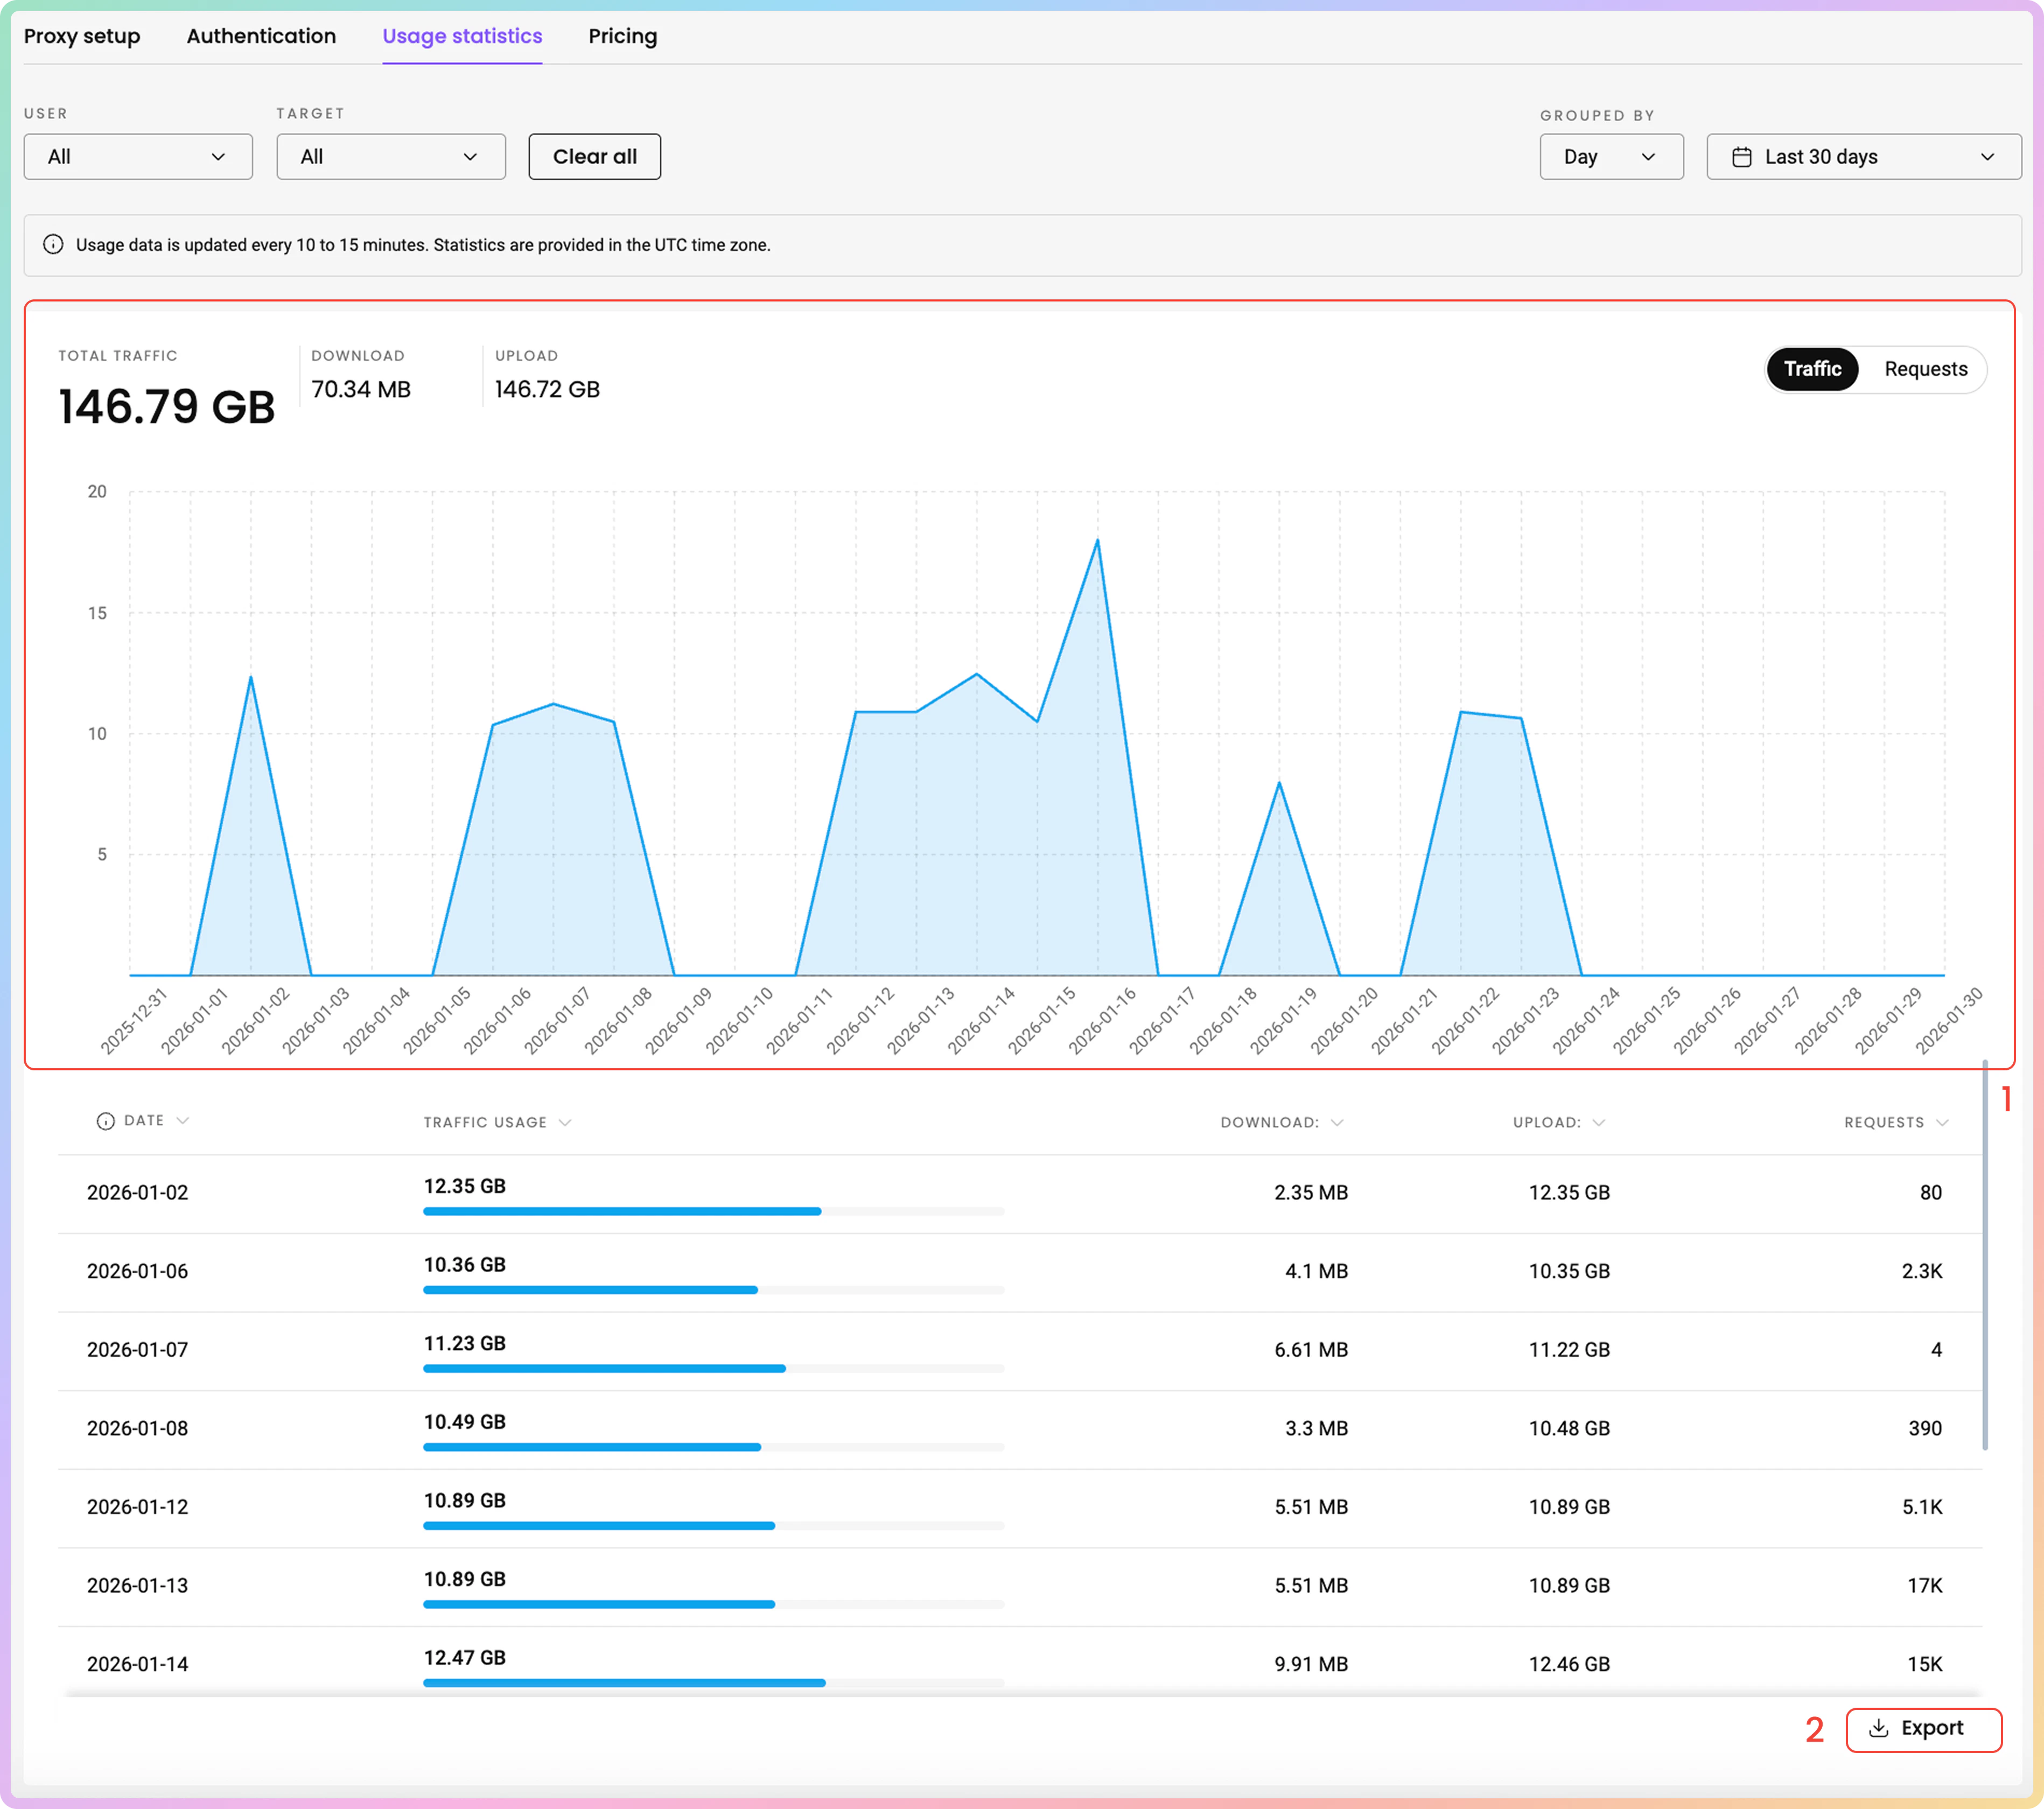
要跟踪专用 ISP 代理使用情况,请导航到[**数据中心 → 专用数据中心 → 代理设置**](https://dashboard.decodo.com/dedicated-dc-ip-proxies/statistics)部分。
1. 在这里,您可以查看按以下方式排序的**流量**或**请求**使用情况的**图表**:**用户**、**目标**,并选择**时间段**。
2. 以 `.CSV`、`.TXT` 或 `.JSON` 格式导出**原始**或**表格数据**。
* 所有日期均为 `UTC`。流量历史记录最多限制为 `180` 天。
## 集成指南
生成端点和端口后,您可以将它们应用于任何应用程序或工具,立即开始使用代理。
### Decodo 工具
* 或者,您可以使用适用于 [**Chrome**](https://help.decodo.com/docs/cn/decodo-chrome-extension#/) 或 [**Firefox**](https://help.decodo.com/docs/cn/decodo-firefox-extension#/) 的 **Decodo 扩展**。
### 集成指南
* 在[**集成概述**](https://help.decodo.com/docs/cn/proxy-integrations-overview)部分查看最受欢迎的第三方工具指南。
### GitHub
* 有关任何**高级代码示例**和**中间件**,请访问我们的 [**GitHub**](https://github.com/decodo/decodo) 页面。
## 统计
要跟踪专用 ISP 代理使用情况,请导航到[**数据中心 → 专用数据中心 → 代理设置**](https://dashboard.decodo.com/dedicated-dc-ip-proxies/statistics)部分。
1. 在这里,您可以查看按以下方式排序的**流量**或**请求**使用情况的**图表**:**用户**、**目标**,并选择**时间段**。
2. 以 `.CSV`、`.TXT` 或 `.JSON` 格式导出**原始**或**表格数据**。
* 所有日期均为 `UTC`。流量历史记录最多限制为 `180` 天。
 ### 热门目标、国家、用户和 IP
* 在下方,您可以在专用部分中看到更详细的信息:
* **热门目标**:编号、目标、流量、请求。
* **热门国家**:国家、流量、请求。
* **热门用户**:用户、流量、请求。
* **热门 IP**:编号、IP、流量、请求。
[**在这里**](https://help.decodo.com/docs/cn/dedicated-datacenter-statistics)您可以找到对**专用数据中心使用统计**页面的更全面了解。
## 故障排除
如果您遇到任何问题,请参阅我们的[**故障排除**](https://help.decodo.com/docs/cn/proxy-troubleshooting#/)部分或直接联系我们的支持团队,我们提供 **24/7** 全天候服务。
***
需要帮助或只是想打个招呼?我们的支持团队全天候为您服务。 \
您也可以随时通过电子邮件 [support@decodo.com](mailto:support@decodo.com) 联系我们。
找不到您要找的内容?请求一篇文章! \
有反馈意见?分享您对我们如何改进的想法。
### 热门目标、国家、用户和 IP
* 在下方,您可以在专用部分中看到更详细的信息:
* **热门目标**:编号、目标、流量、请求。
* **热门国家**:国家、流量、请求。
* **热门用户**:用户、流量、请求。
* **热门 IP**:编号、IP、流量、请求。
[**在这里**](https://help.decodo.com/docs/cn/dedicated-datacenter-statistics)您可以找到对**专用数据中心使用统计**页面的更全面了解。
## 故障排除
如果您遇到任何问题,请参阅我们的[**故障排除**](https://help.decodo.com/docs/cn/proxy-troubleshooting#/)部分或直接联系我们的支持团队,我们提供 **24/7** 全天候服务。
***
需要帮助或只是想打个招呼?我们的支持团队全天候为您服务。 \
您也可以随时通过电子邮件 [support@decodo.com](mailto:support@decodo.com) 联系我们。
找不到您要找的内容?请求一篇文章! \
有反馈意见?分享您对我们如何改进的想法。