> ## Documentation Index
> Fetch the complete documentation index at: https://help.decodo.com/llms.txt
> Use this file to discover all available pages before exploring further.
# Authentication Methods
> Datacenter Pay/IP Proxy Authentication Methods
We support Datacenter Pay/IP proxy authentication via username and password or IP-based whitelisting.
You can manage **proxy users** and **whitelisted IPs** on the [**Datacenter → Datacenter Pay/IP → Authentication**](https://dashboard.decodo.com/datacenter-ips/authentication) page.
* After you purchase a subscription, a proxy username and password will be automatically generated in the Authentication section.
* The default number of whitelisted IP slots is **10**. Please [**contact**](https://direct.lc.chat/12092754/1) our customer support for more information.
### Dashboard Access
If you cannot log in to the dashboard, please request a password change by going to the [**Reset Password**](https://dashboard.decodo.com/password-reset) page.
***
## User:pass Authentication
### Managing Proxy Users
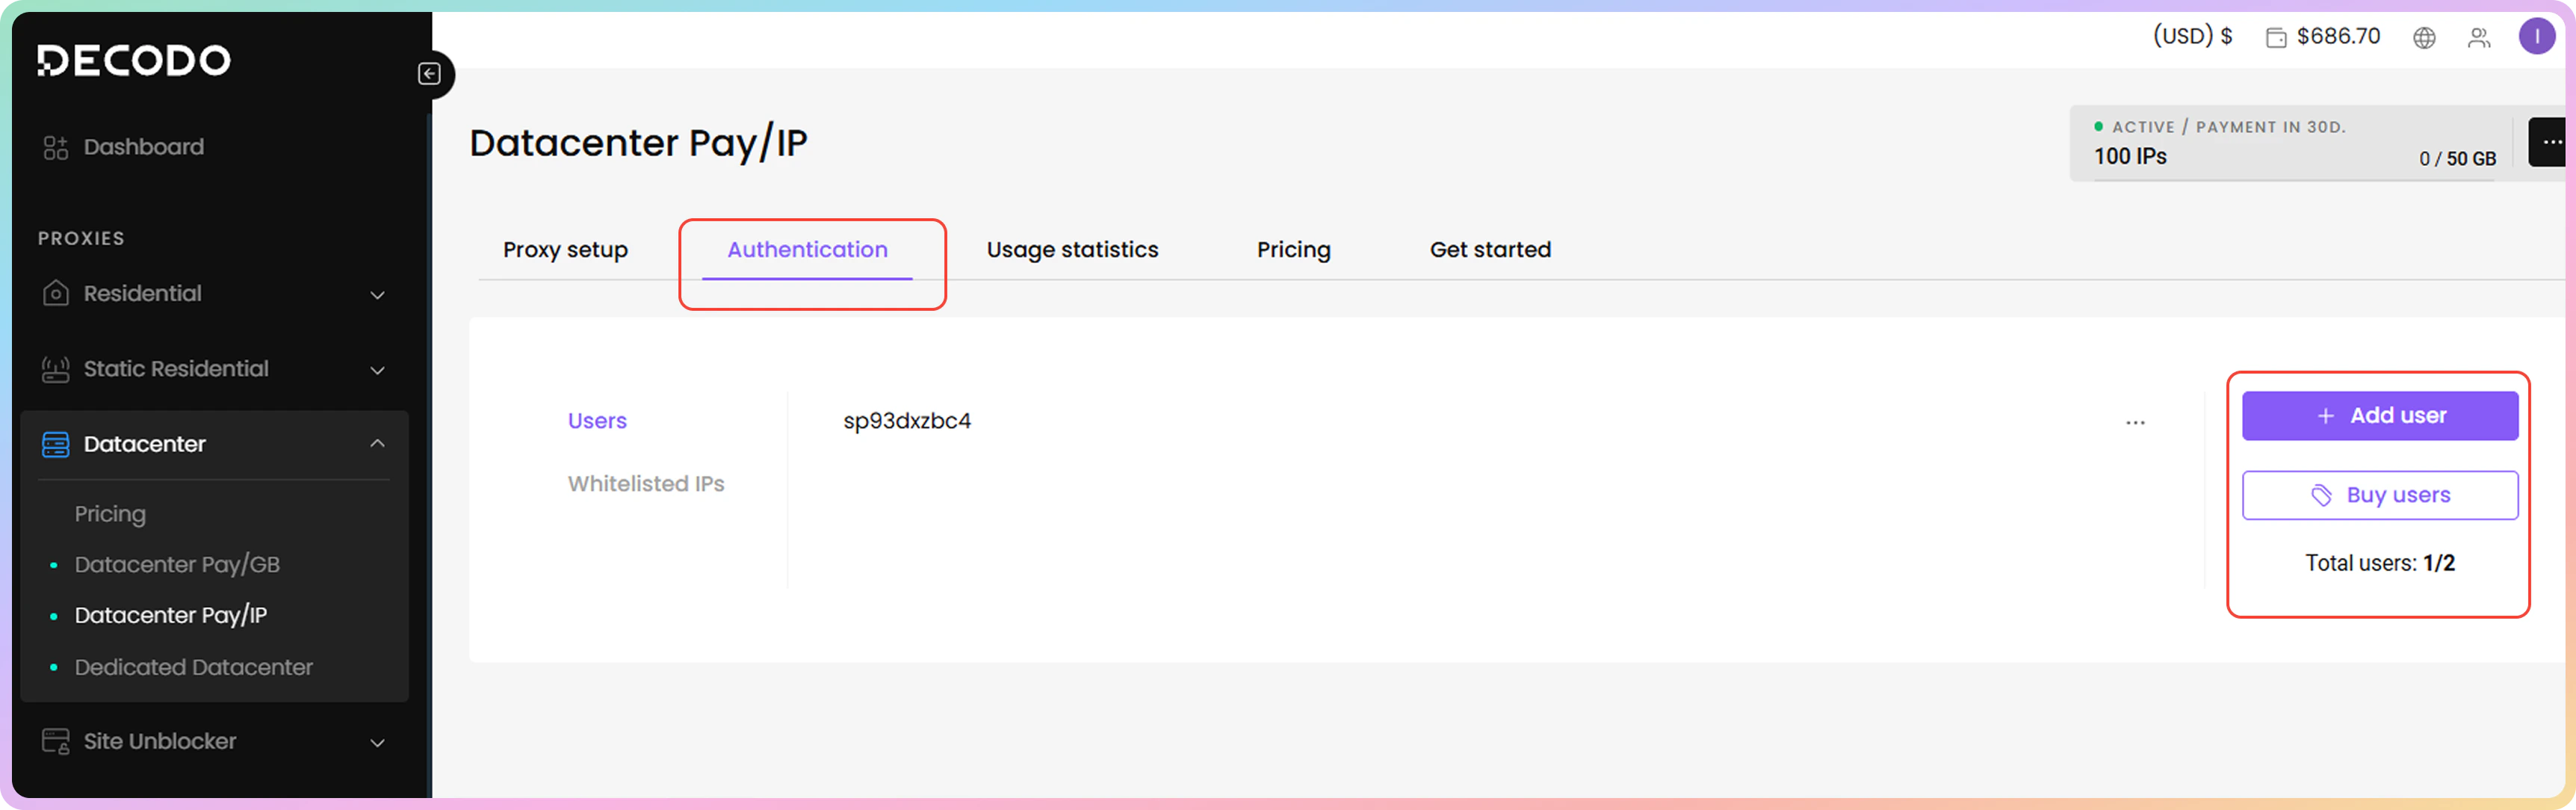
* You can manage your **proxy users** by clicking the **Users** tab in the Authentication section.
* You can **buy** additional users by clicking **Buy users** on the right.
* The default number of Users depends on the **Number of IPs** you select during checkout.
 Currently, you **cannot rename** proxy users. If needed, you can create a new one or recreate a proxy user by deleting it.
### Editing Proxy Users
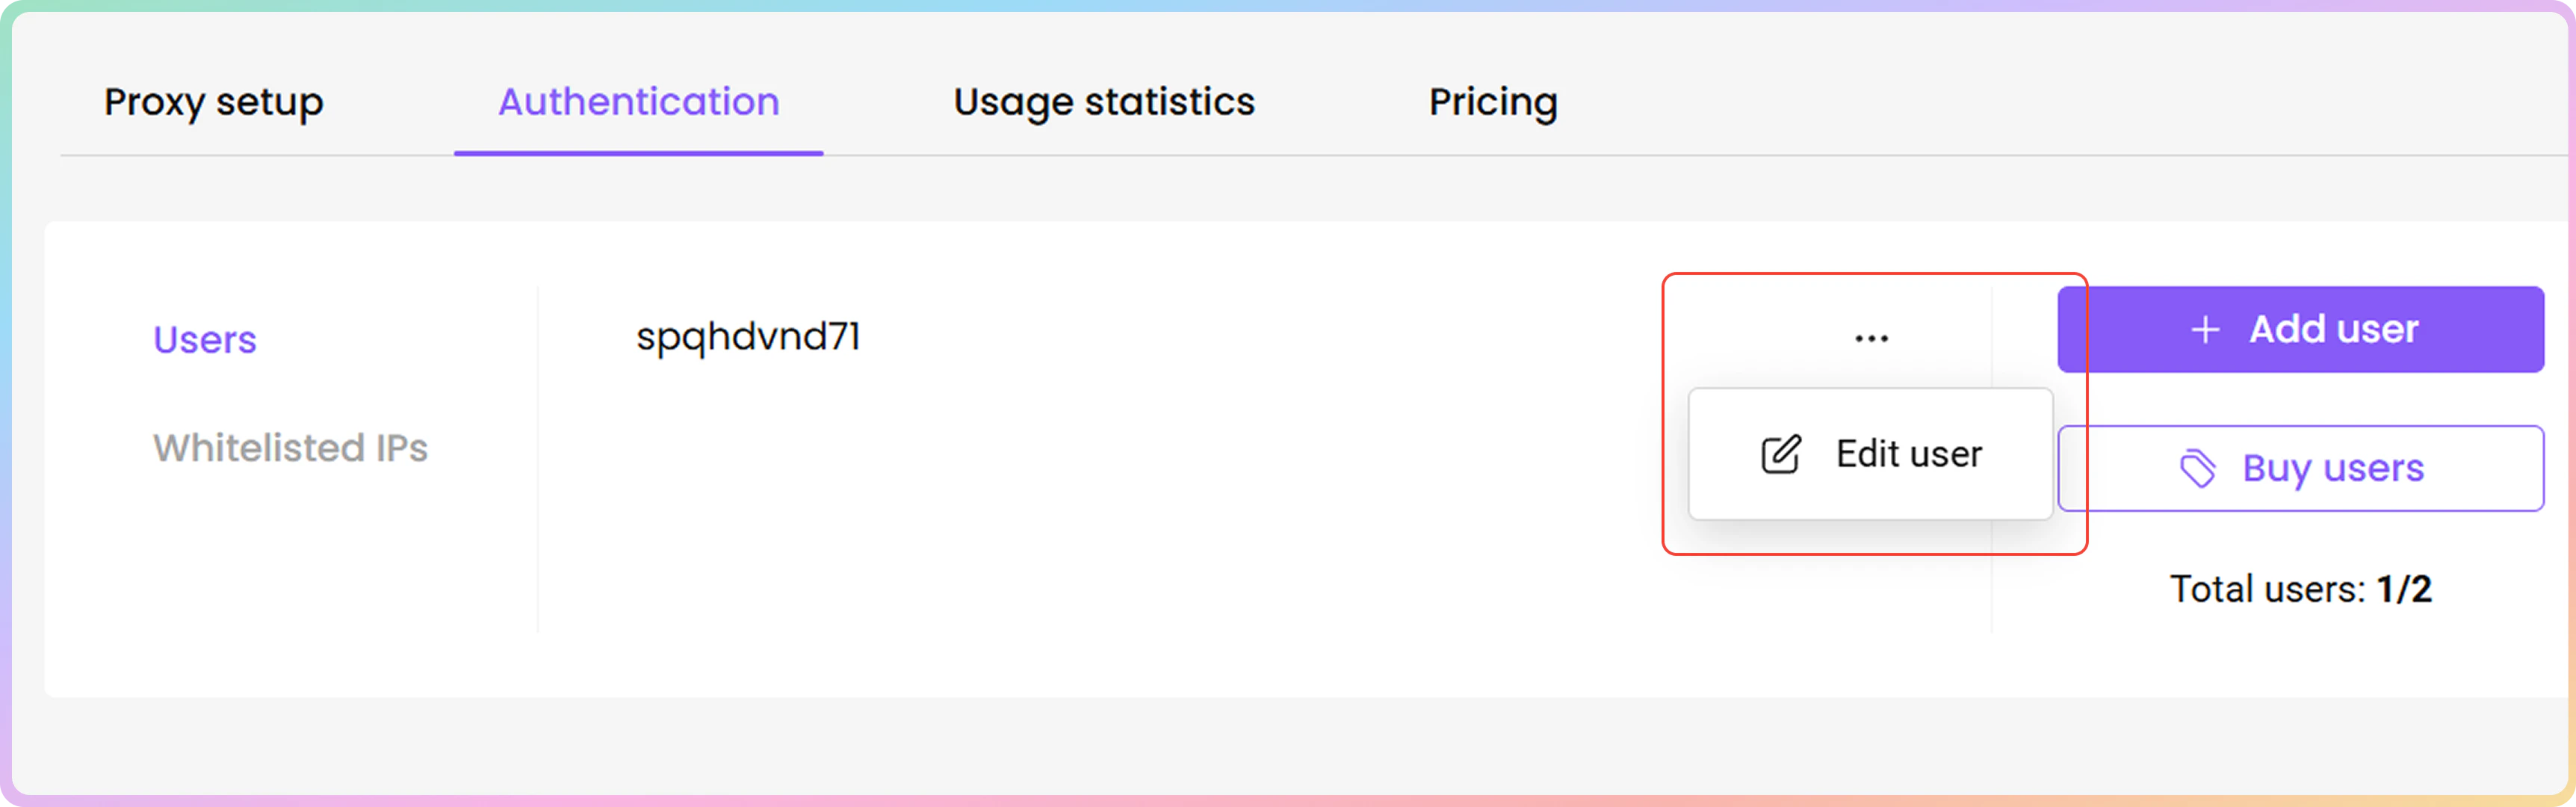
To **edit** a proxy user, click the **three dots** and then **Edit user**. A menu on the right will open.
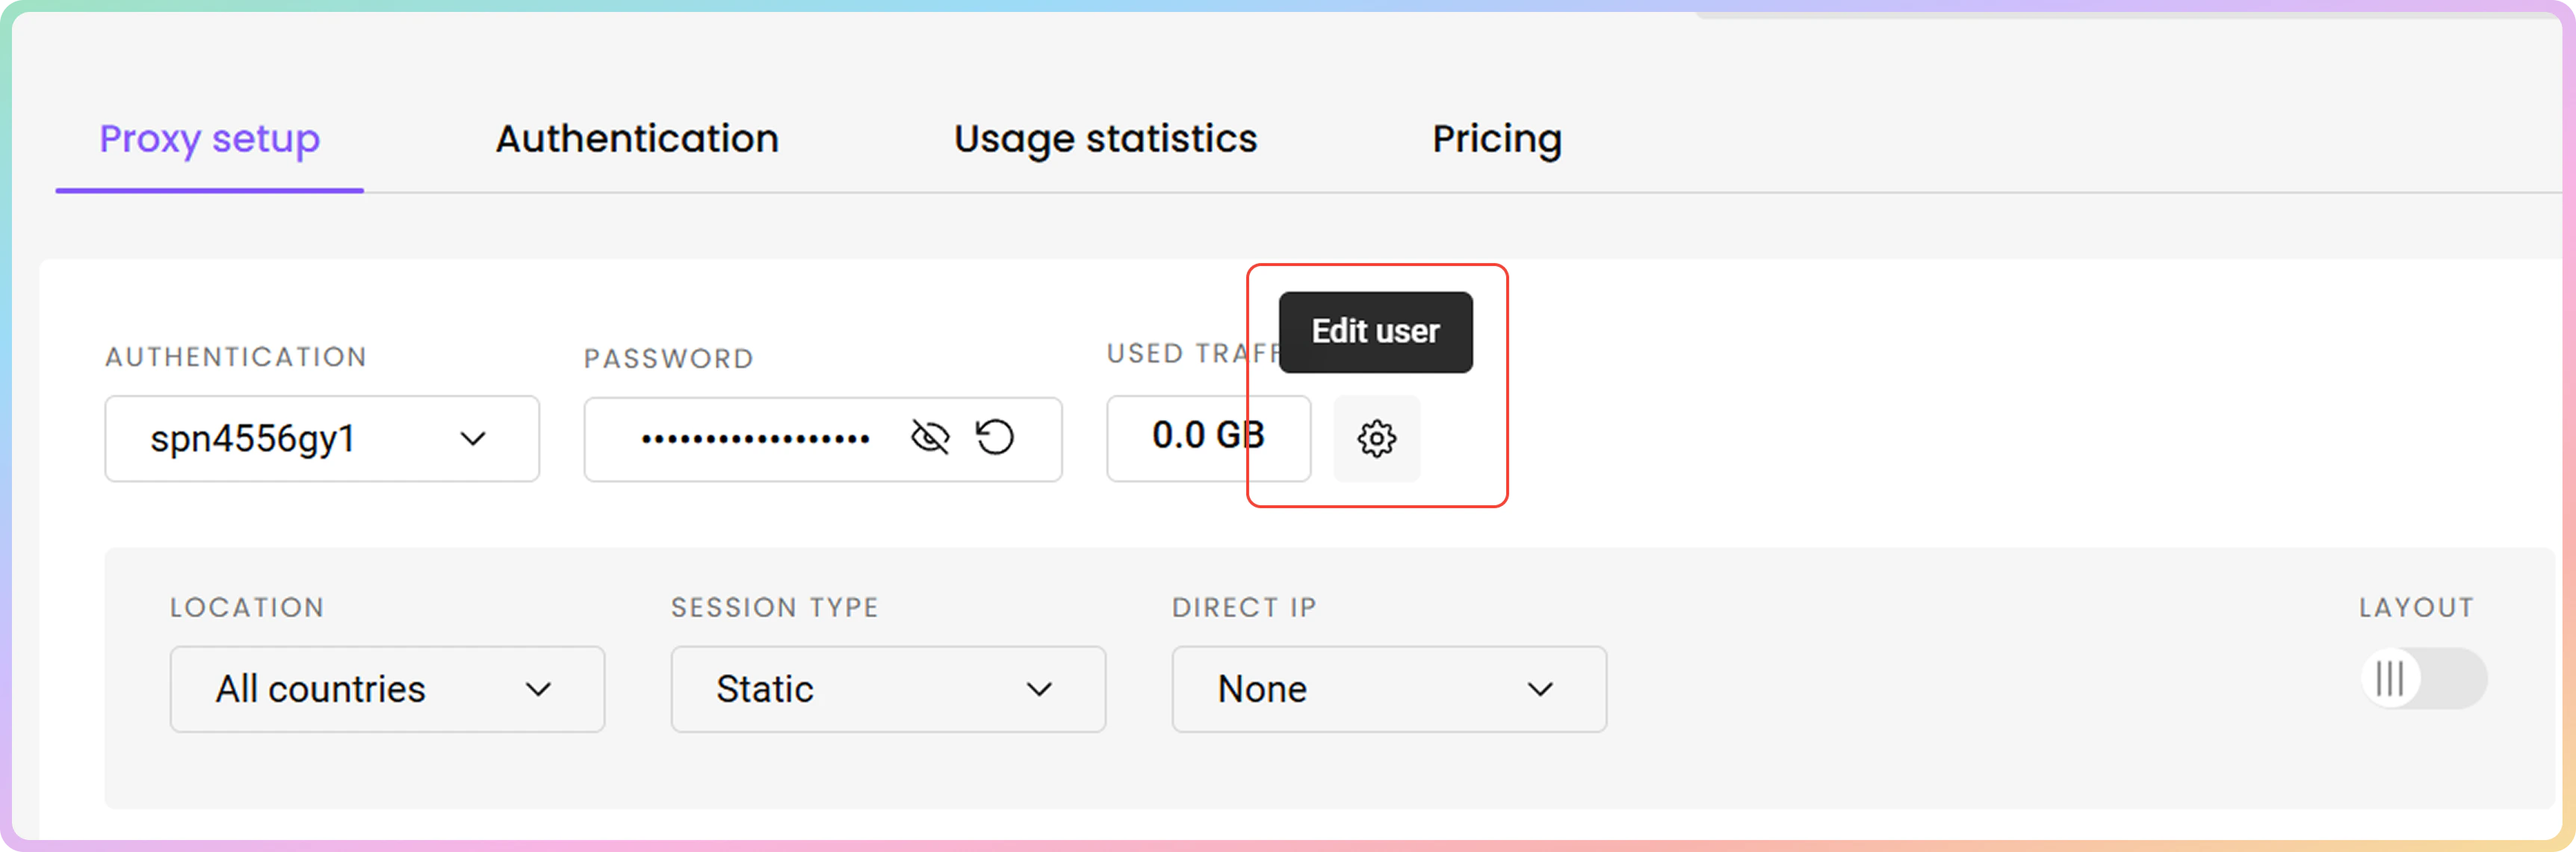
* Alternatively, you can **add** or **edit proxy users** directly in the [**Proxy Setup**](https://dashboard.decodo.com/datacenter-ips/proxy-setup) section.
Currently, you **cannot rename** proxy users. If needed, you can create a new one or recreate a proxy user by deleting it.
### Editing Proxy Users
To **edit** a proxy user, click the **three dots** and then **Edit user**. A menu on the right will open.
* Alternatively, you can **add** or **edit proxy users** directly in the [**Proxy Setup**](https://dashboard.decodo.com/datacenter-ips/proxy-setup) section.
 ### Password Generation
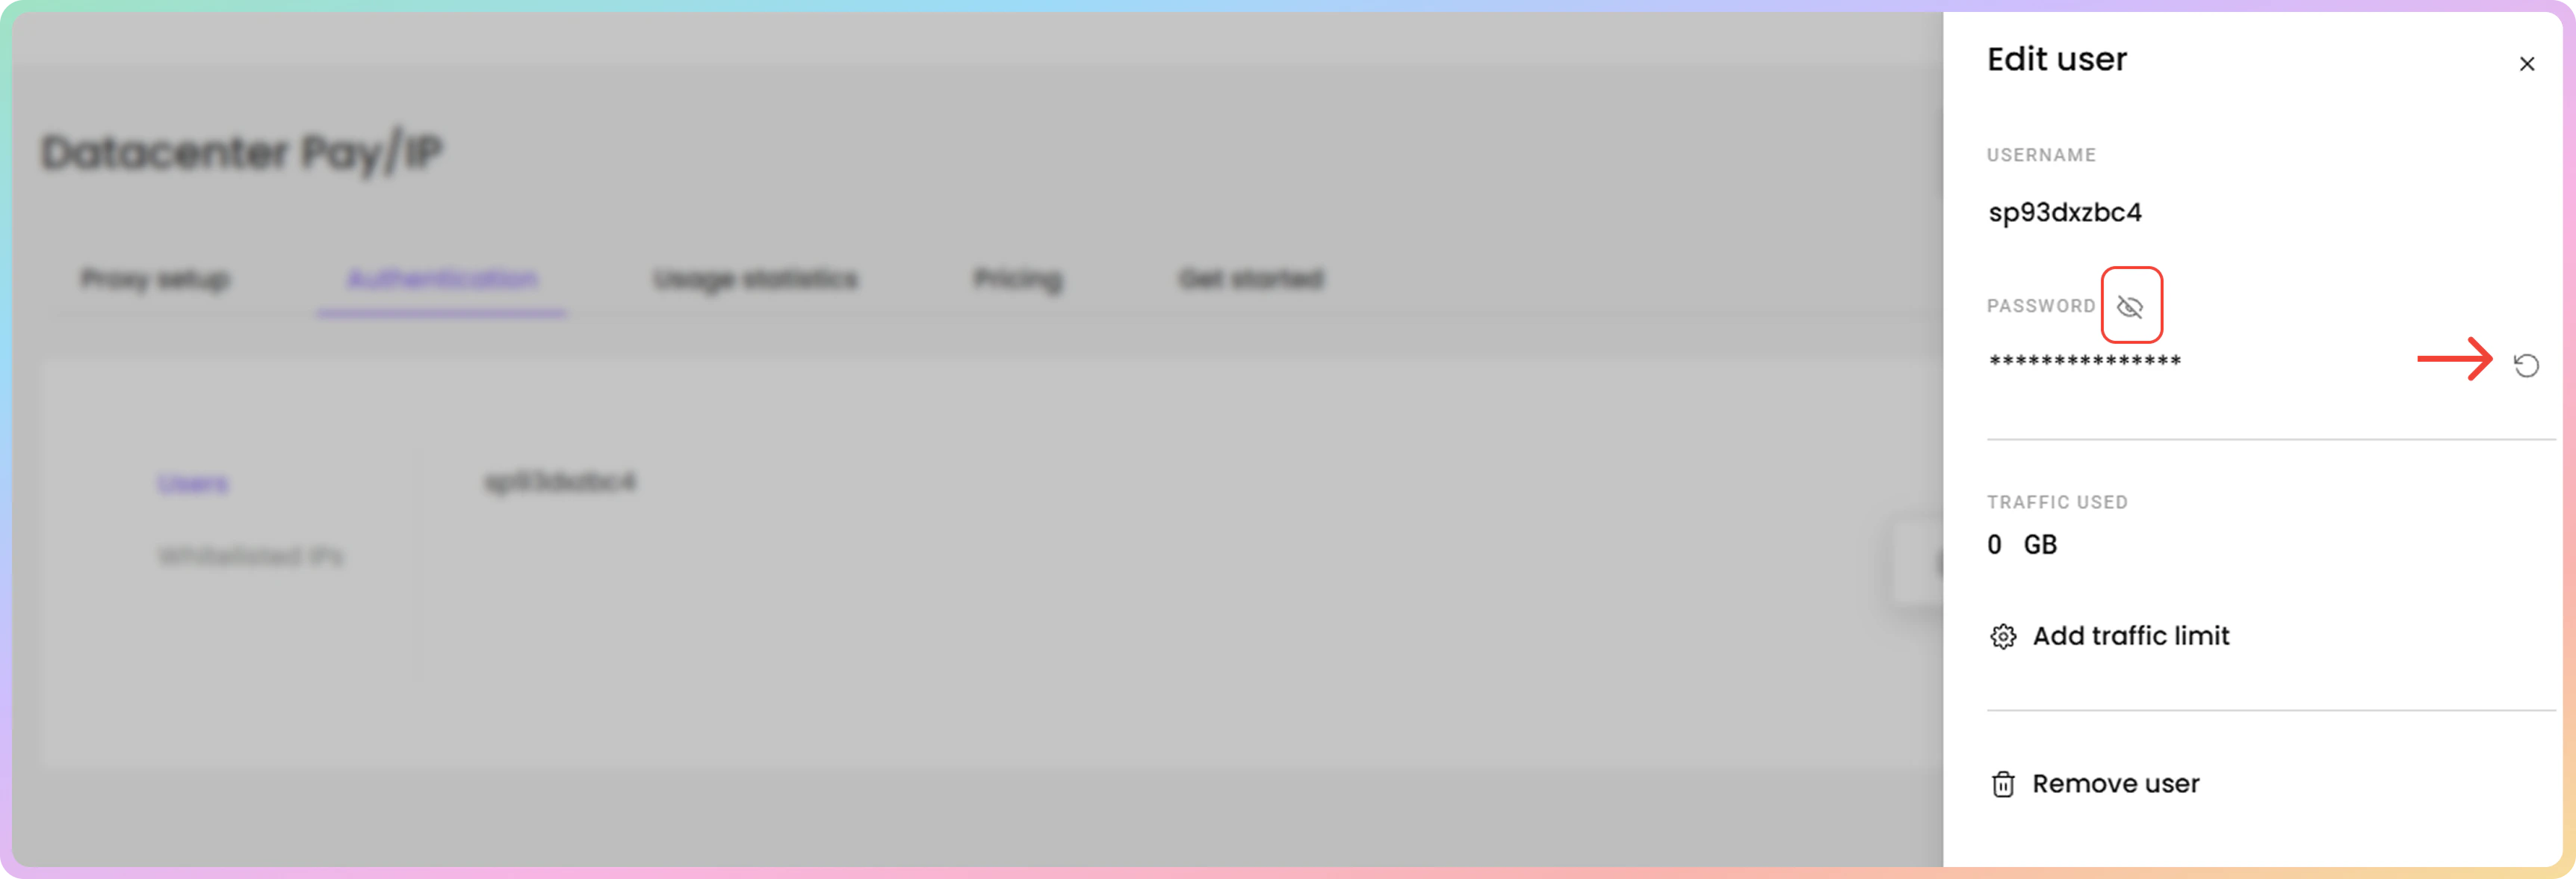
* To **change** your proxy user's **password**, click the **Generate password** button next to the password.
* To reveal or hide the password, click the **eye** icon.
* You can **copy** the username and password by clicking on them.
### Password Generation
* To **change** your proxy user's **password**, click the **Generate password** button next to the password.
* To reveal or hide the password, click the **eye** icon.
* You can **copy** the username and password by clicking on them.
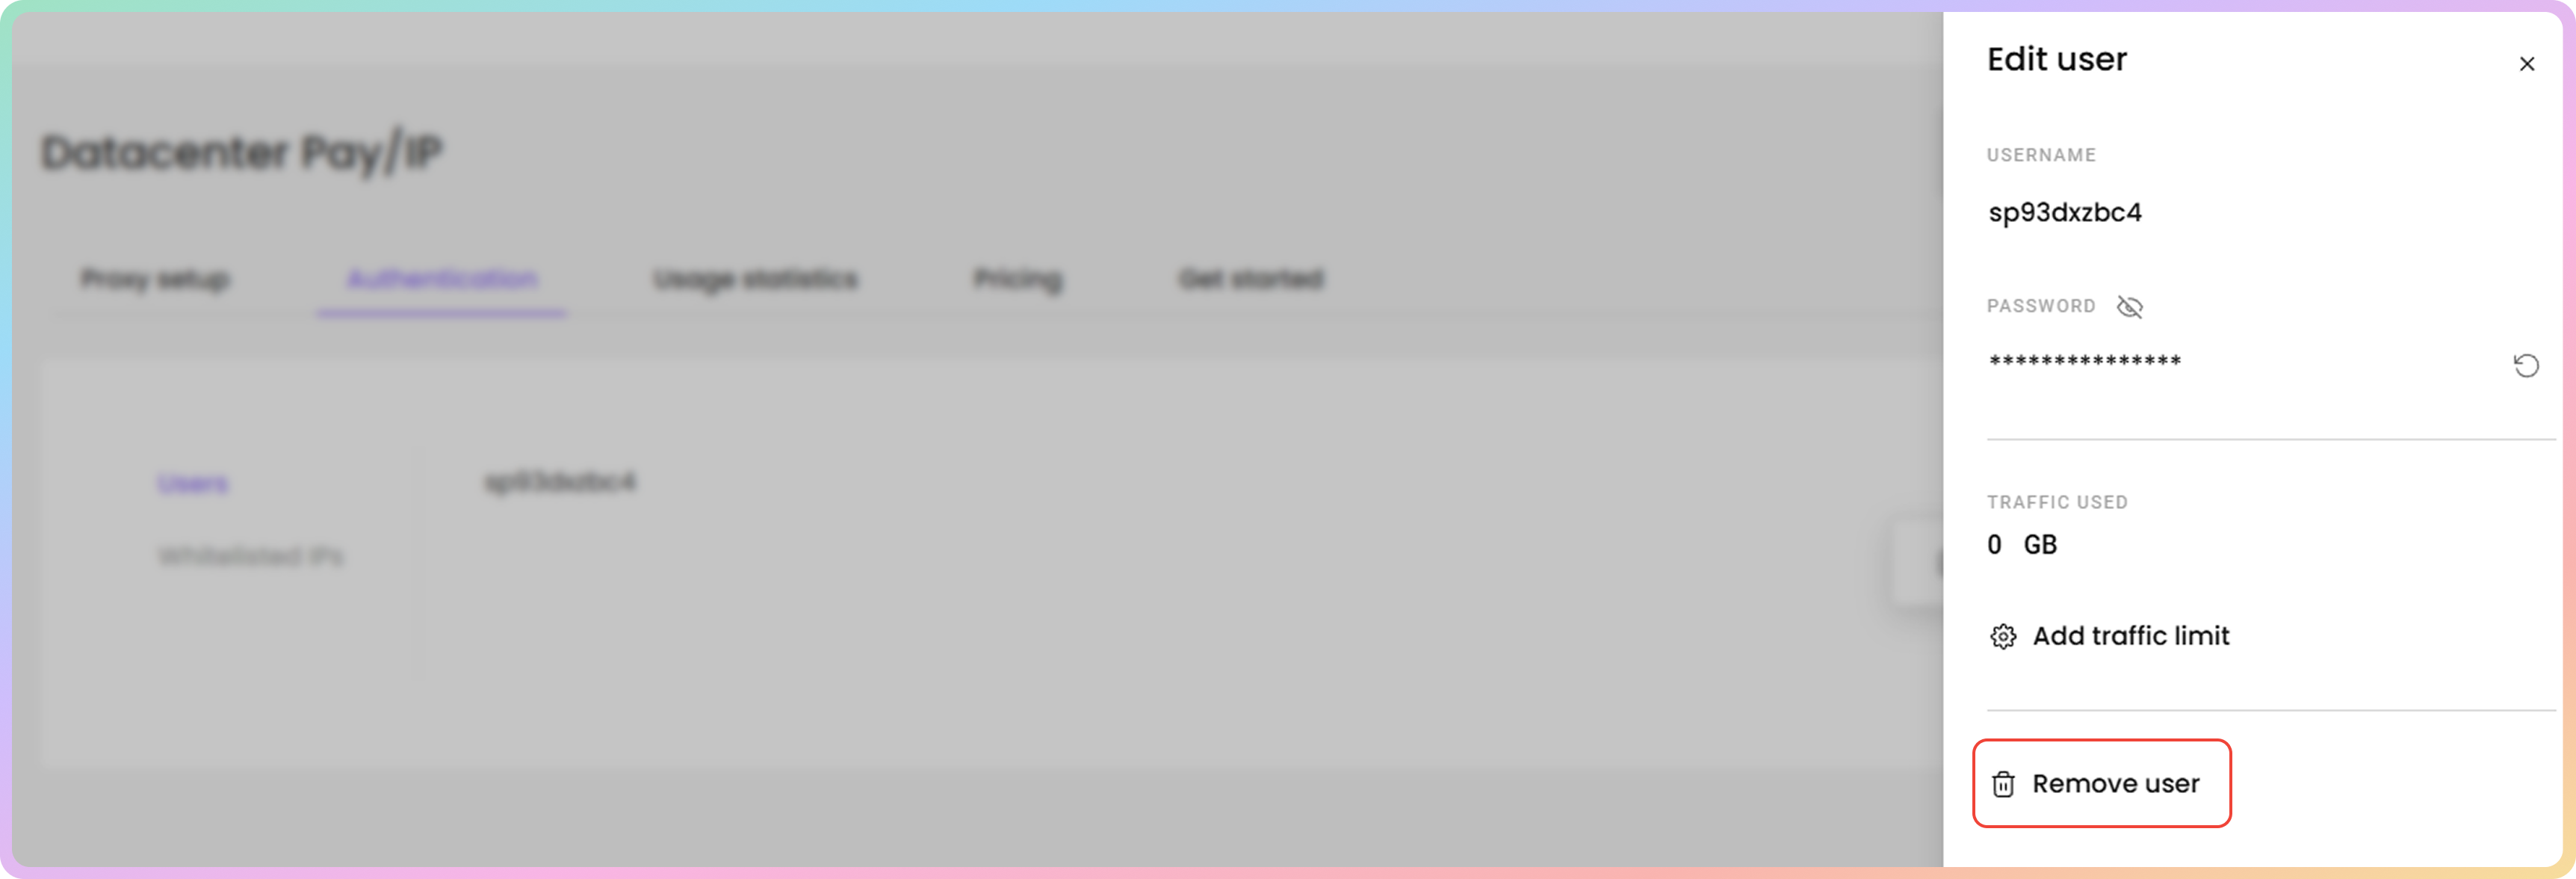
 ### Traffic Limit Management
1. To **add**, **edit**, or remove a **traffic limit** for a specific proxy user, click **Add traffic limit**.
2. Type in the traffic limit and click the checkmark button to add or edit a limit. Click **X** to cancel.
3. Click **Edit** to change the traffic limit or the **Bin** icon to **remove** it.
4. Click **Save**.
### Proxy User Deletion
* To **delete** a proxy user, click **Remove user** and then **Confirm**.
### Traffic Limit Management
1. To **add**, **edit**, or remove a **traffic limit** for a specific proxy user, click **Add traffic limit**.
2. Type in the traffic limit and click the checkmark button to add or edit a limit. Click **X** to cancel.
3. Click **Edit** to change the traffic limit or the **Bin** icon to **remove** it.
4. Click **Save**.
### Proxy User Deletion
* To **delete** a proxy user, click **Remove user** and then **Confirm**.
 ### Adding a proxy user
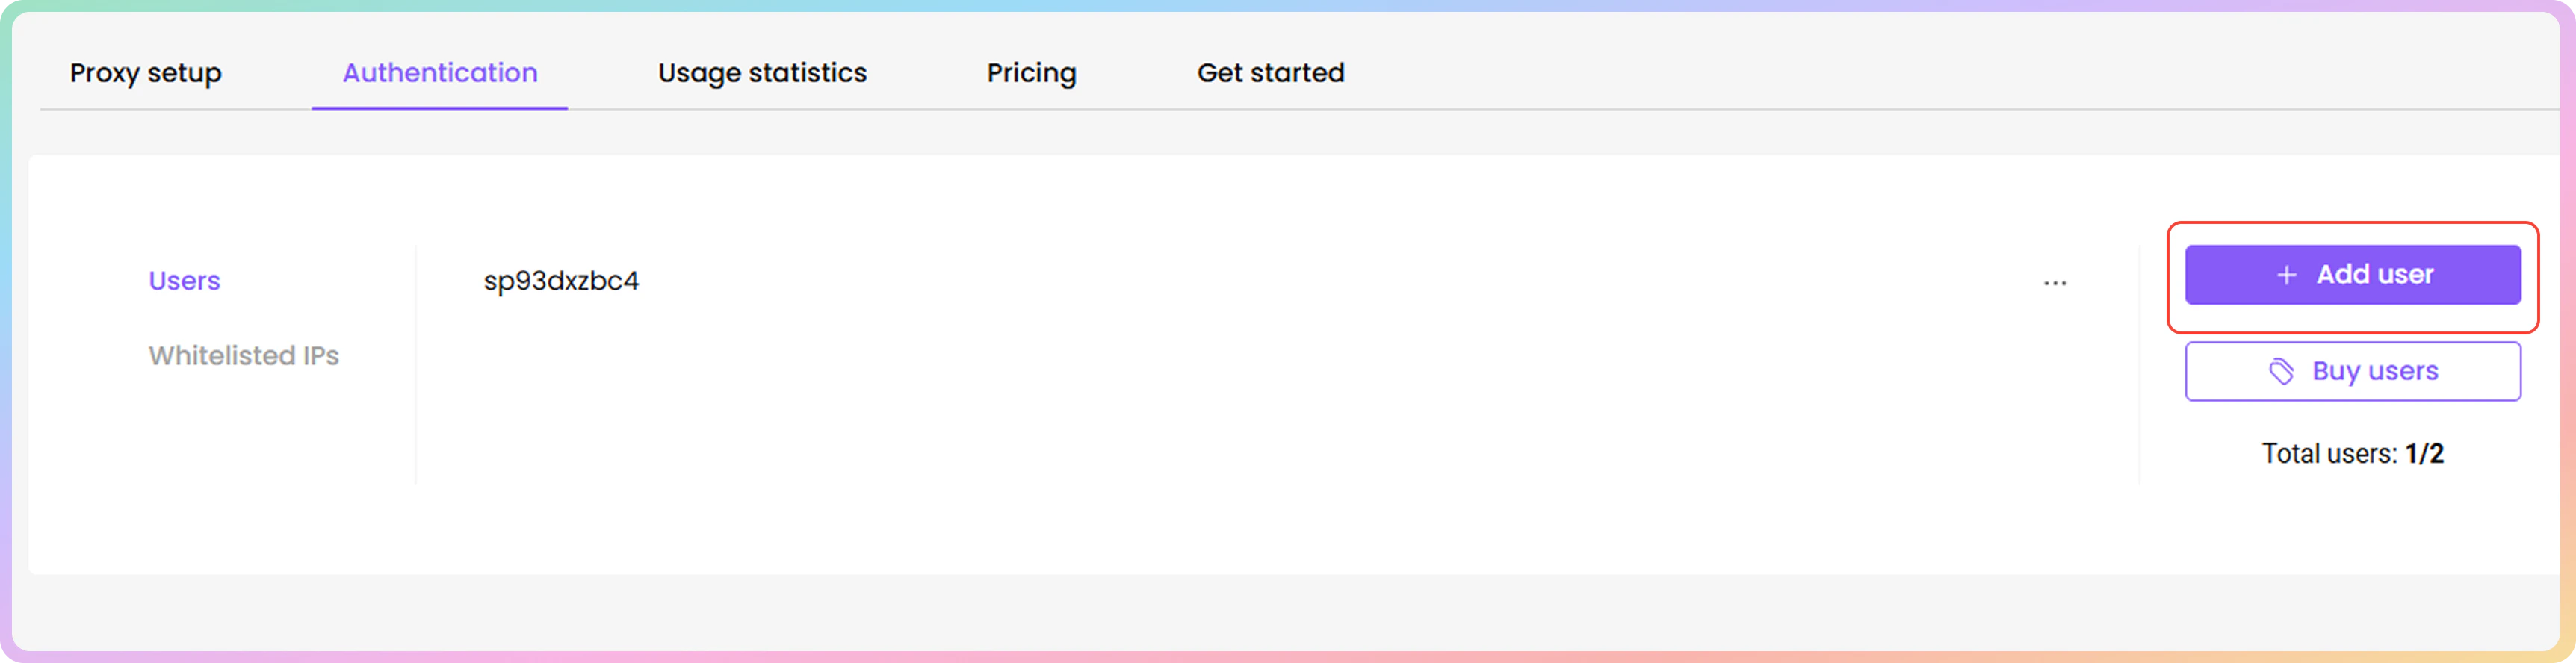
1. To **create** a new proxy username and password, click **+ Add user**. A menu on the right will open.
* A vacancy is required for this option to appear. Check the **Total users** count.
### Adding a proxy user
1. To **create** a new proxy username and password, click **+ Add user**. A menu on the right will open.
* A vacancy is required for this option to appear. Check the **Total users** count.
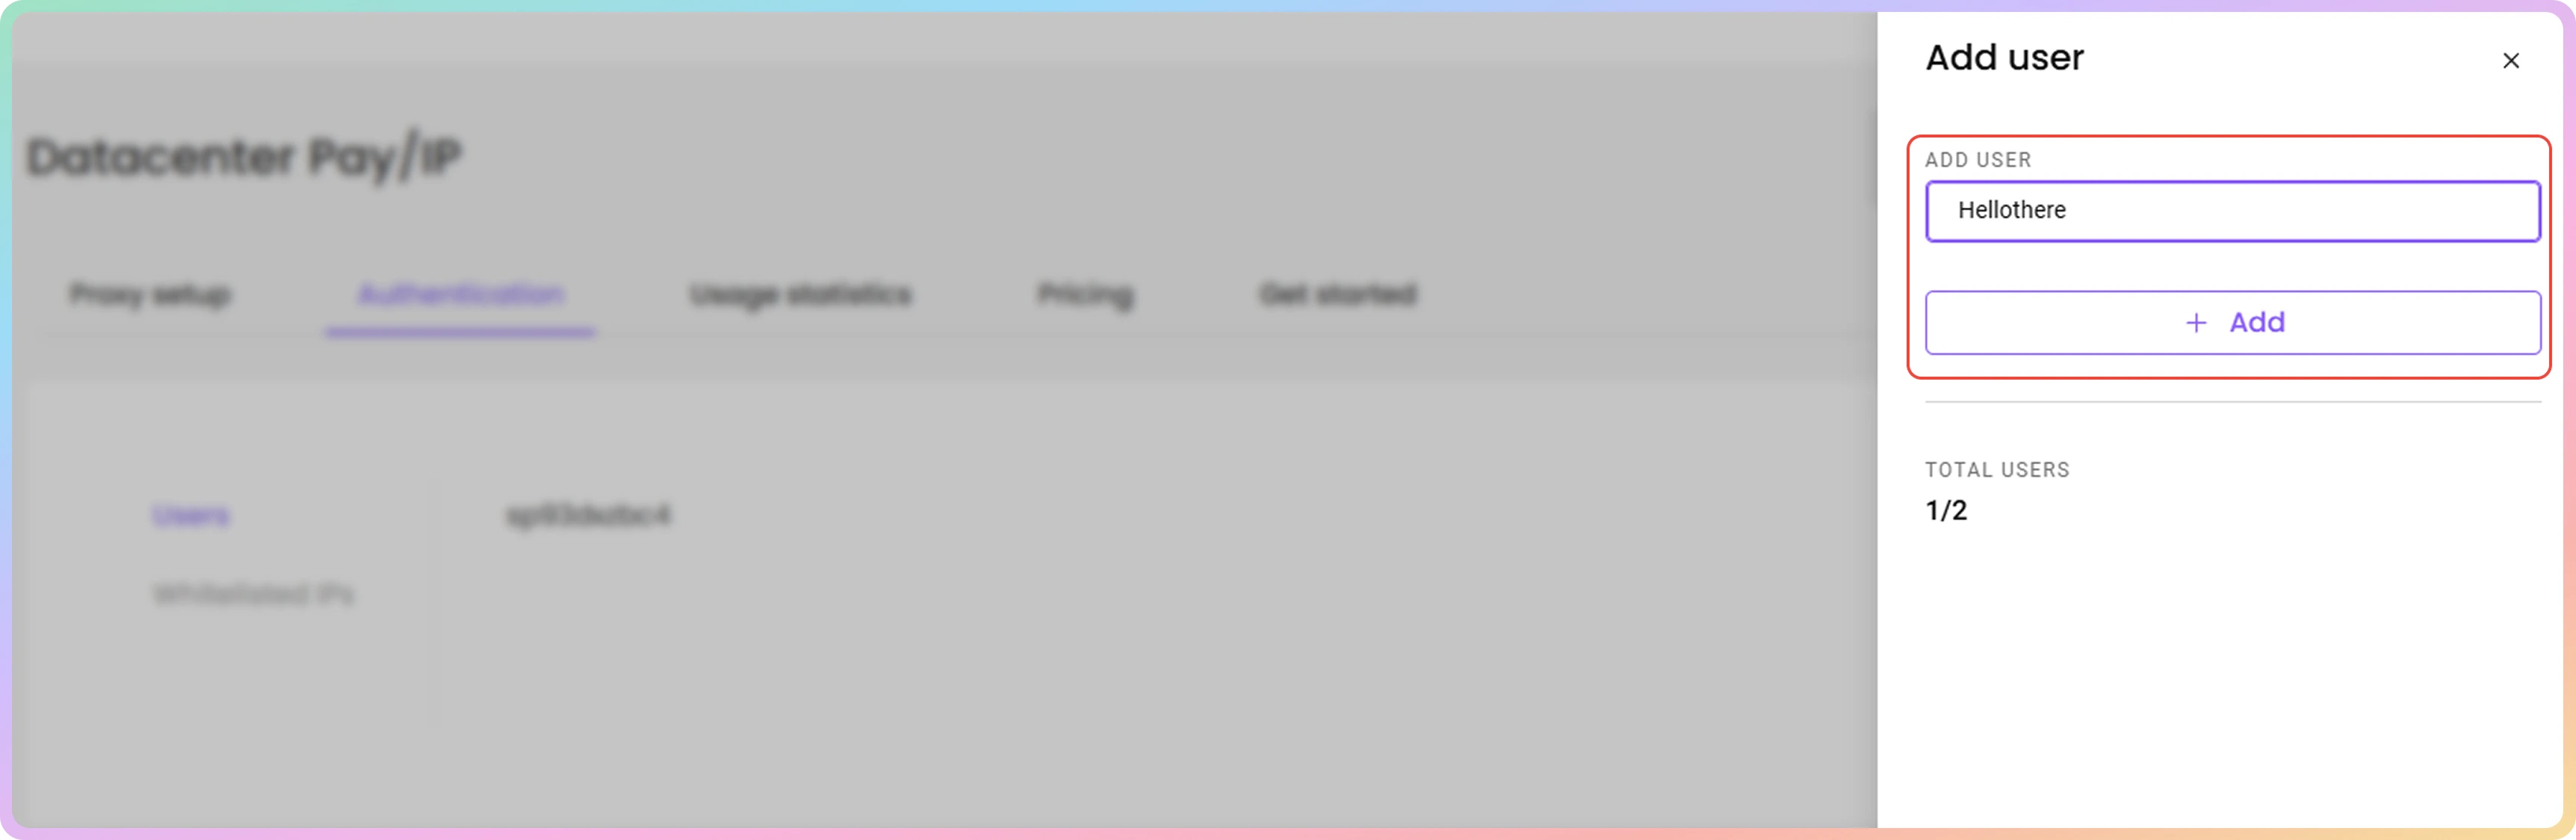
 2. Type in the username you want, and click **+ Add**. A password will be automatically generated.
* The username must be 6 to 64 characters long, letters and numbers only, no spaces.
2. Type in the username you want, and click **+ Add**. A password will be automatically generated.
* The username must be 6 to 64 characters long, letters and numbers only, no spaces.
 ### 407 Error / Proxy Authentication Required
If you cannot authenticate with proxy user credentials, then try generating a new password
***
## Whitelisted IP Authentication
### Managing Whitelisted IPs
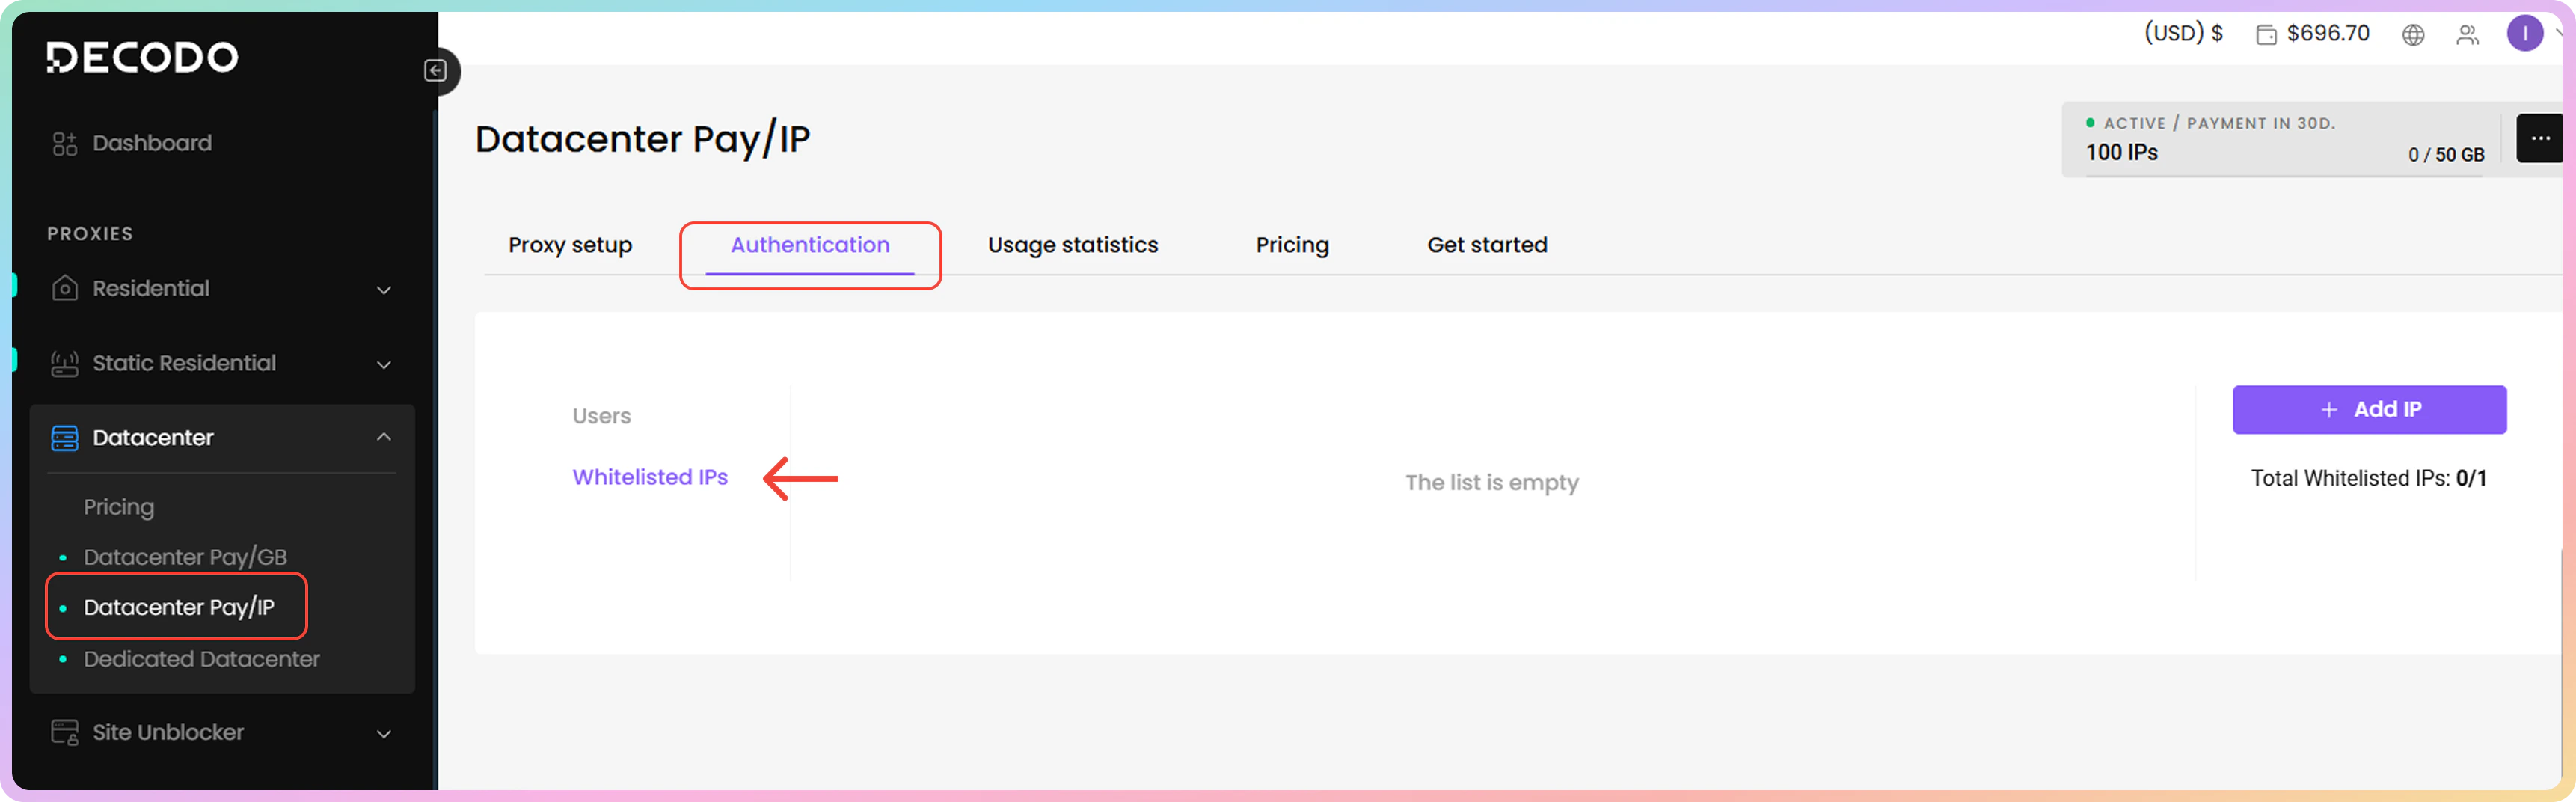
1. You can manage your **whitelisted IPs** by clicking the **Whitelisted IPs** tab in the Authentication section.
* The list will be empty by default.
### 407 Error / Proxy Authentication Required
If you cannot authenticate with proxy user credentials, then try generating a new password
***
## Whitelisted IP Authentication
### Managing Whitelisted IPs
1. You can manage your **whitelisted IPs** by clicking the **Whitelisted IPs** tab in the Authentication section.
* The list will be empty by default.
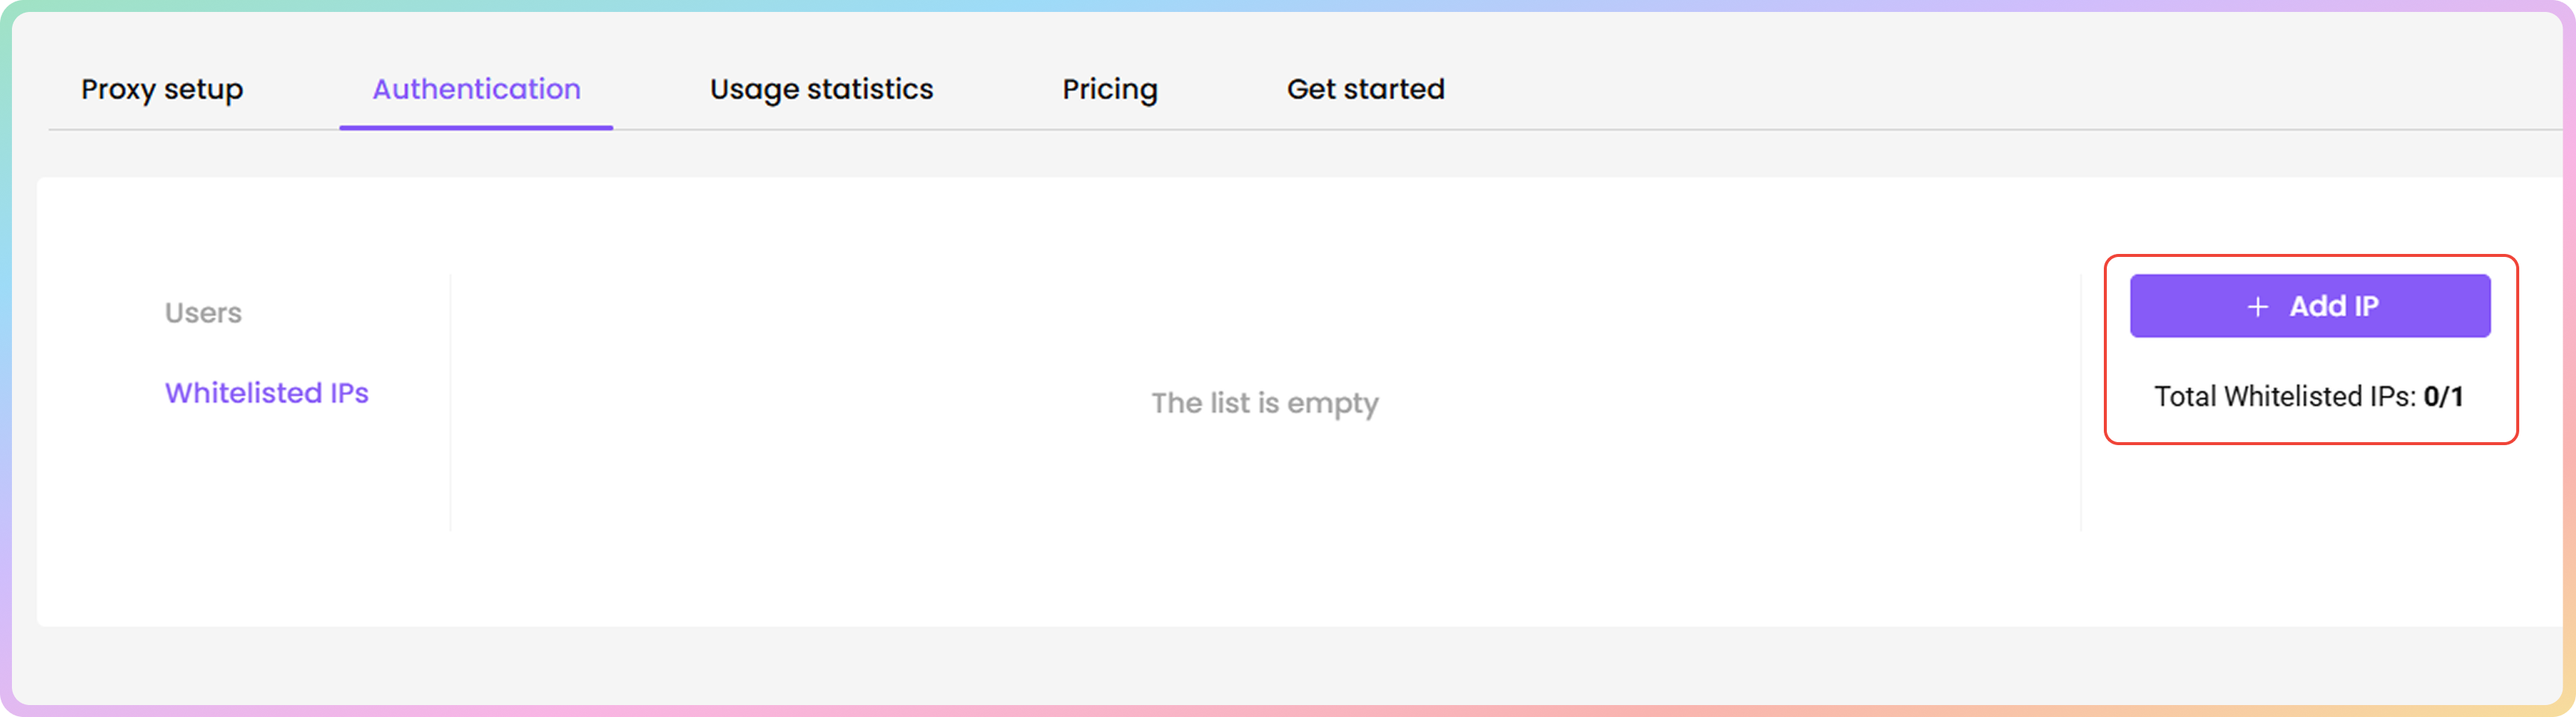
 2. To **add** a new **IP address** to the whitelist, click **+ Add IP**. A menu on the right will open.
* To **buy** more than 10 Whitelisted IP slots, please contact our 24/7 customer support by clicking the chat widget on the bottom right or by using this [**link**](https://direct.lc.chat/12092754/1).
2. To **add** a new **IP address** to the whitelist, click **+ Add IP**. A menu on the right will open.
* To **buy** more than 10 Whitelisted IP slots, please contact our 24/7 customer support by clicking the chat widget on the bottom right or by using this [**link**](https://direct.lc.chat/12092754/1).
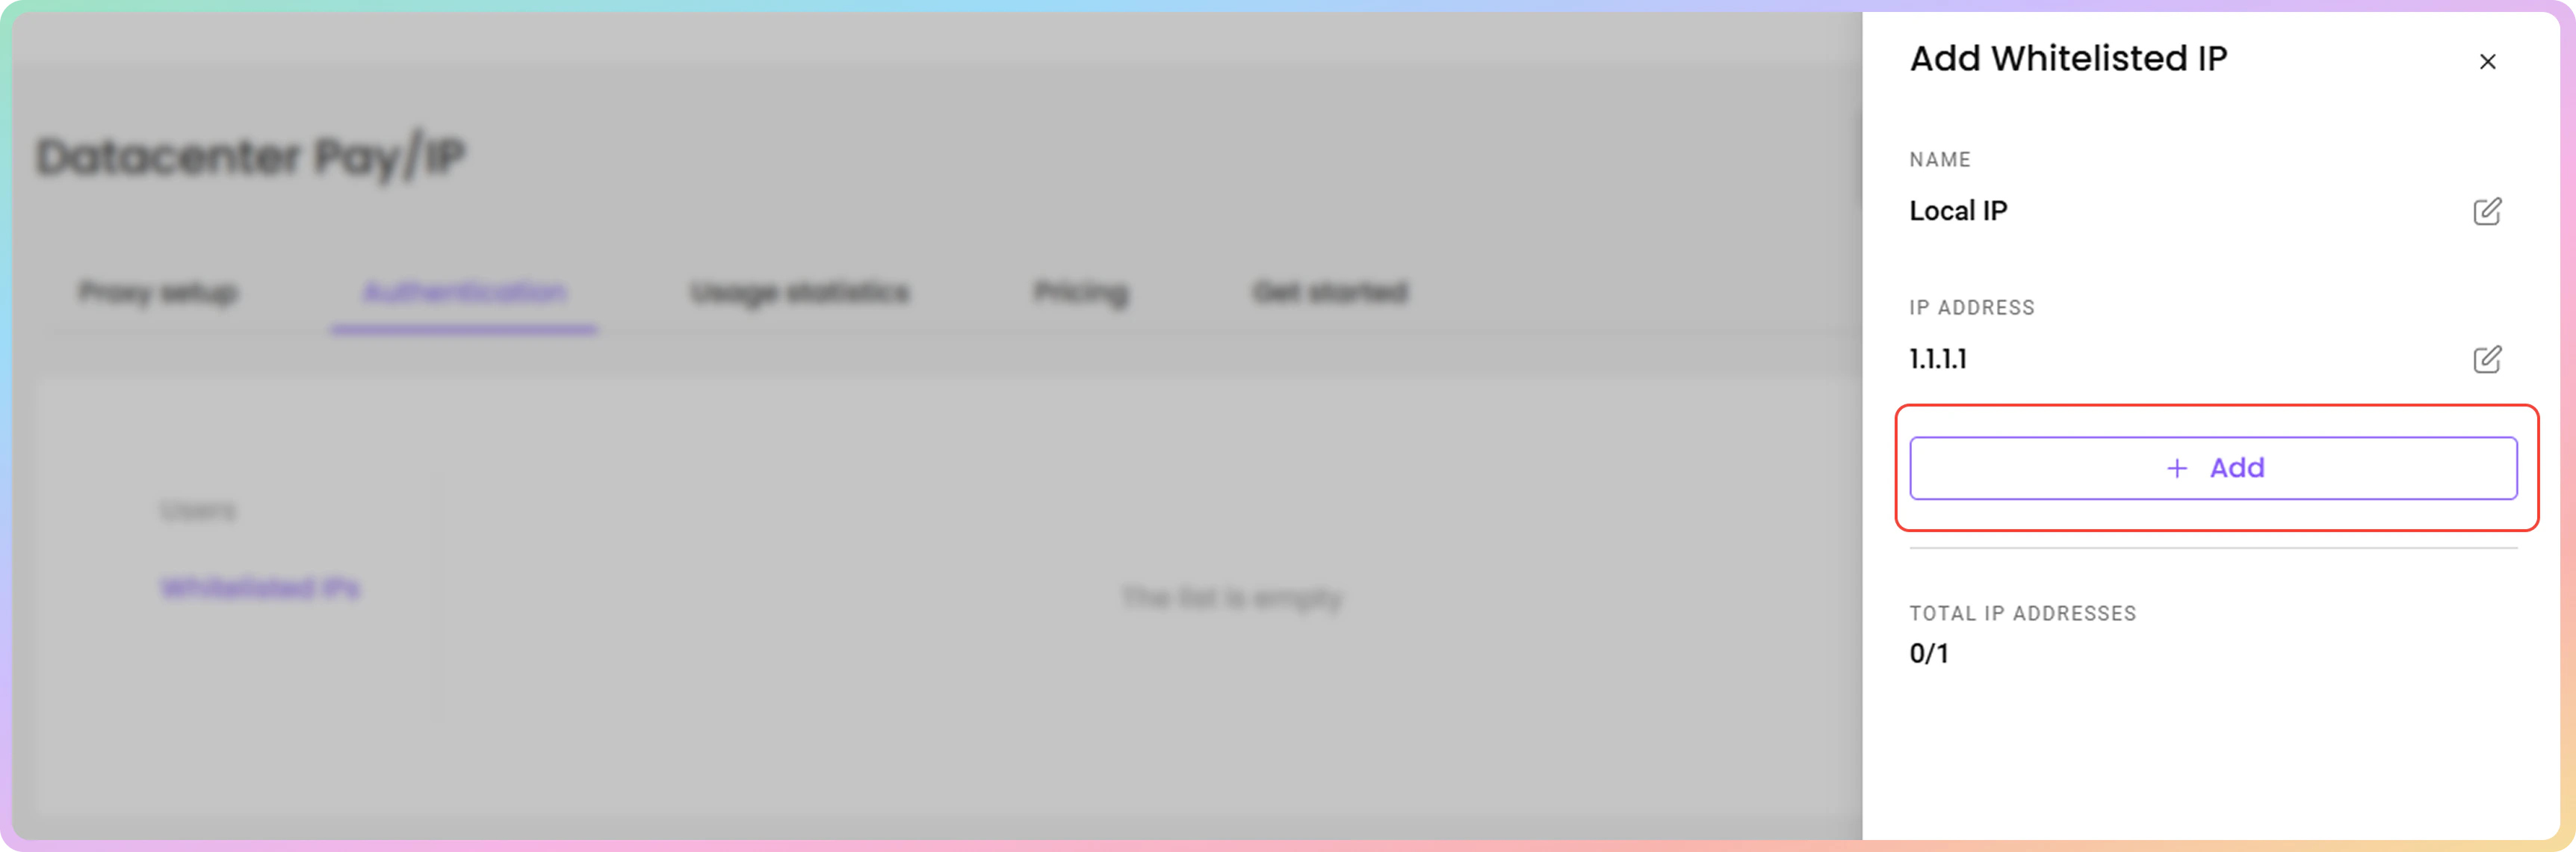
 3. Enter your desired **IP address**, click **+ Add** to whitelist it or **Edit** to enter a specific one manually.
* You can only add IPs that are in **IPv4** format (xx.xx.xx.xx). The **IPv6** format is not supported.
* Ensure that the IP you are adding is yours, only accessible by you and that you are not using a Proxy or VPN service at the time.
3. Enter your desired **IP address**, click **+ Add** to whitelist it or **Edit** to enter a specific one manually.
* You can only add IPs that are in **IPv4** format (xx.xx.xx.xx). The **IPv6** format is not supported.
* Ensure that the IP you are adding is yours, only accessible by you and that you are not using a Proxy or VPN service at the time.
 ### Editing Whitelisted IPs
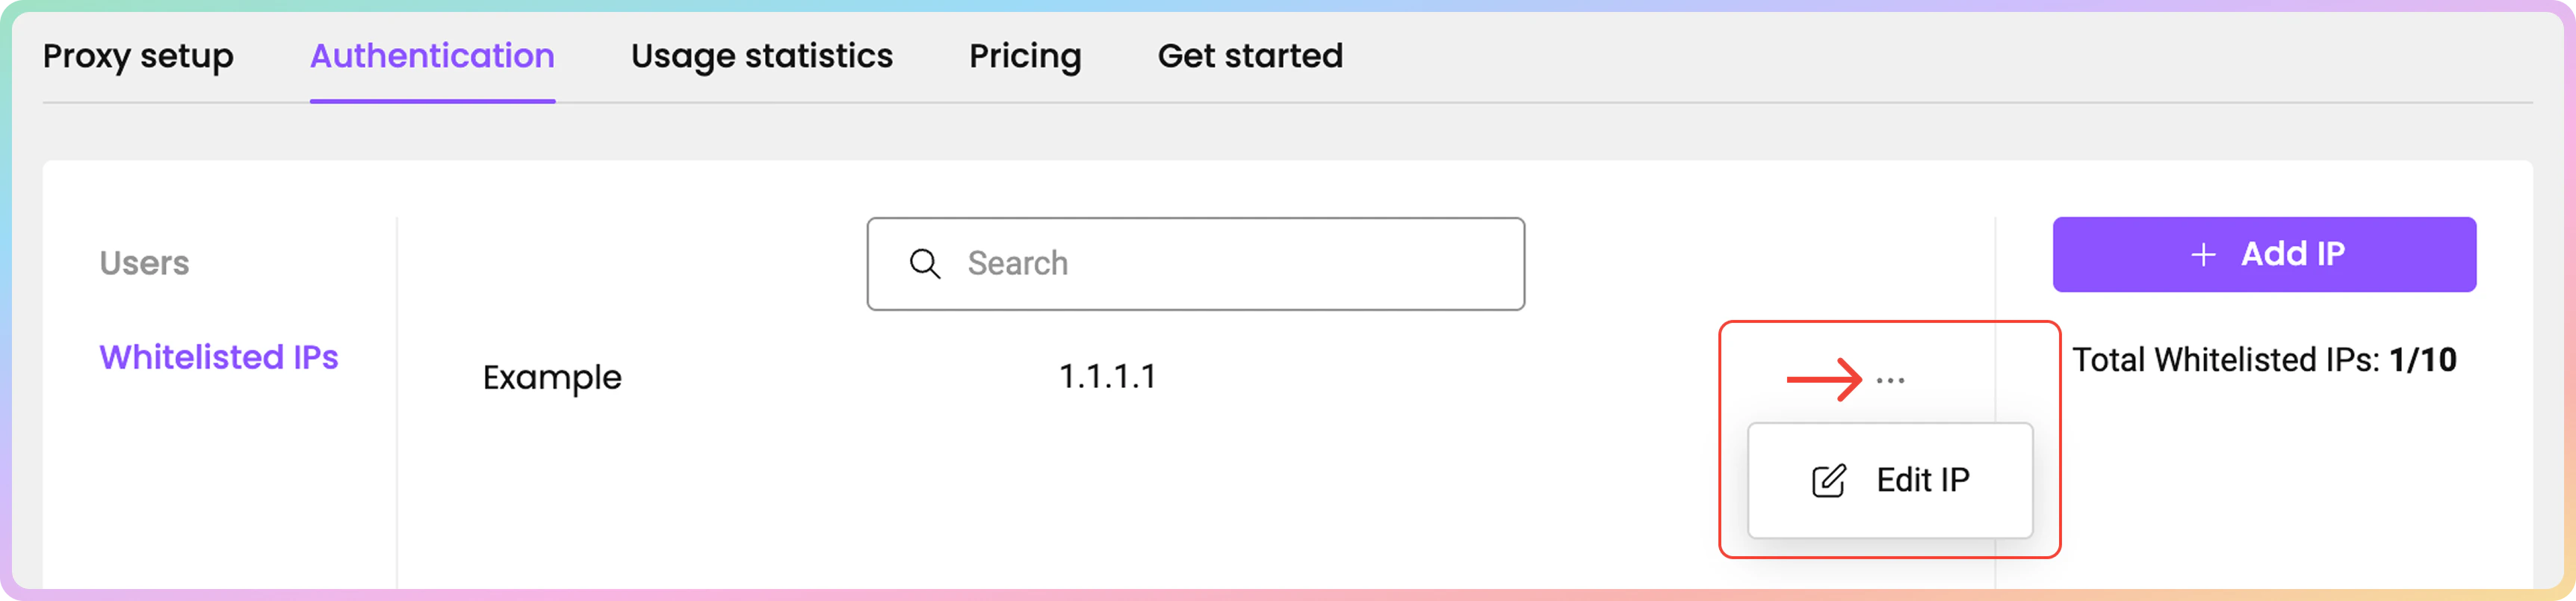
* To **edit** a whitelisted IP, click the **three dots**, and then **Edit IP**. A menu on the right will open.
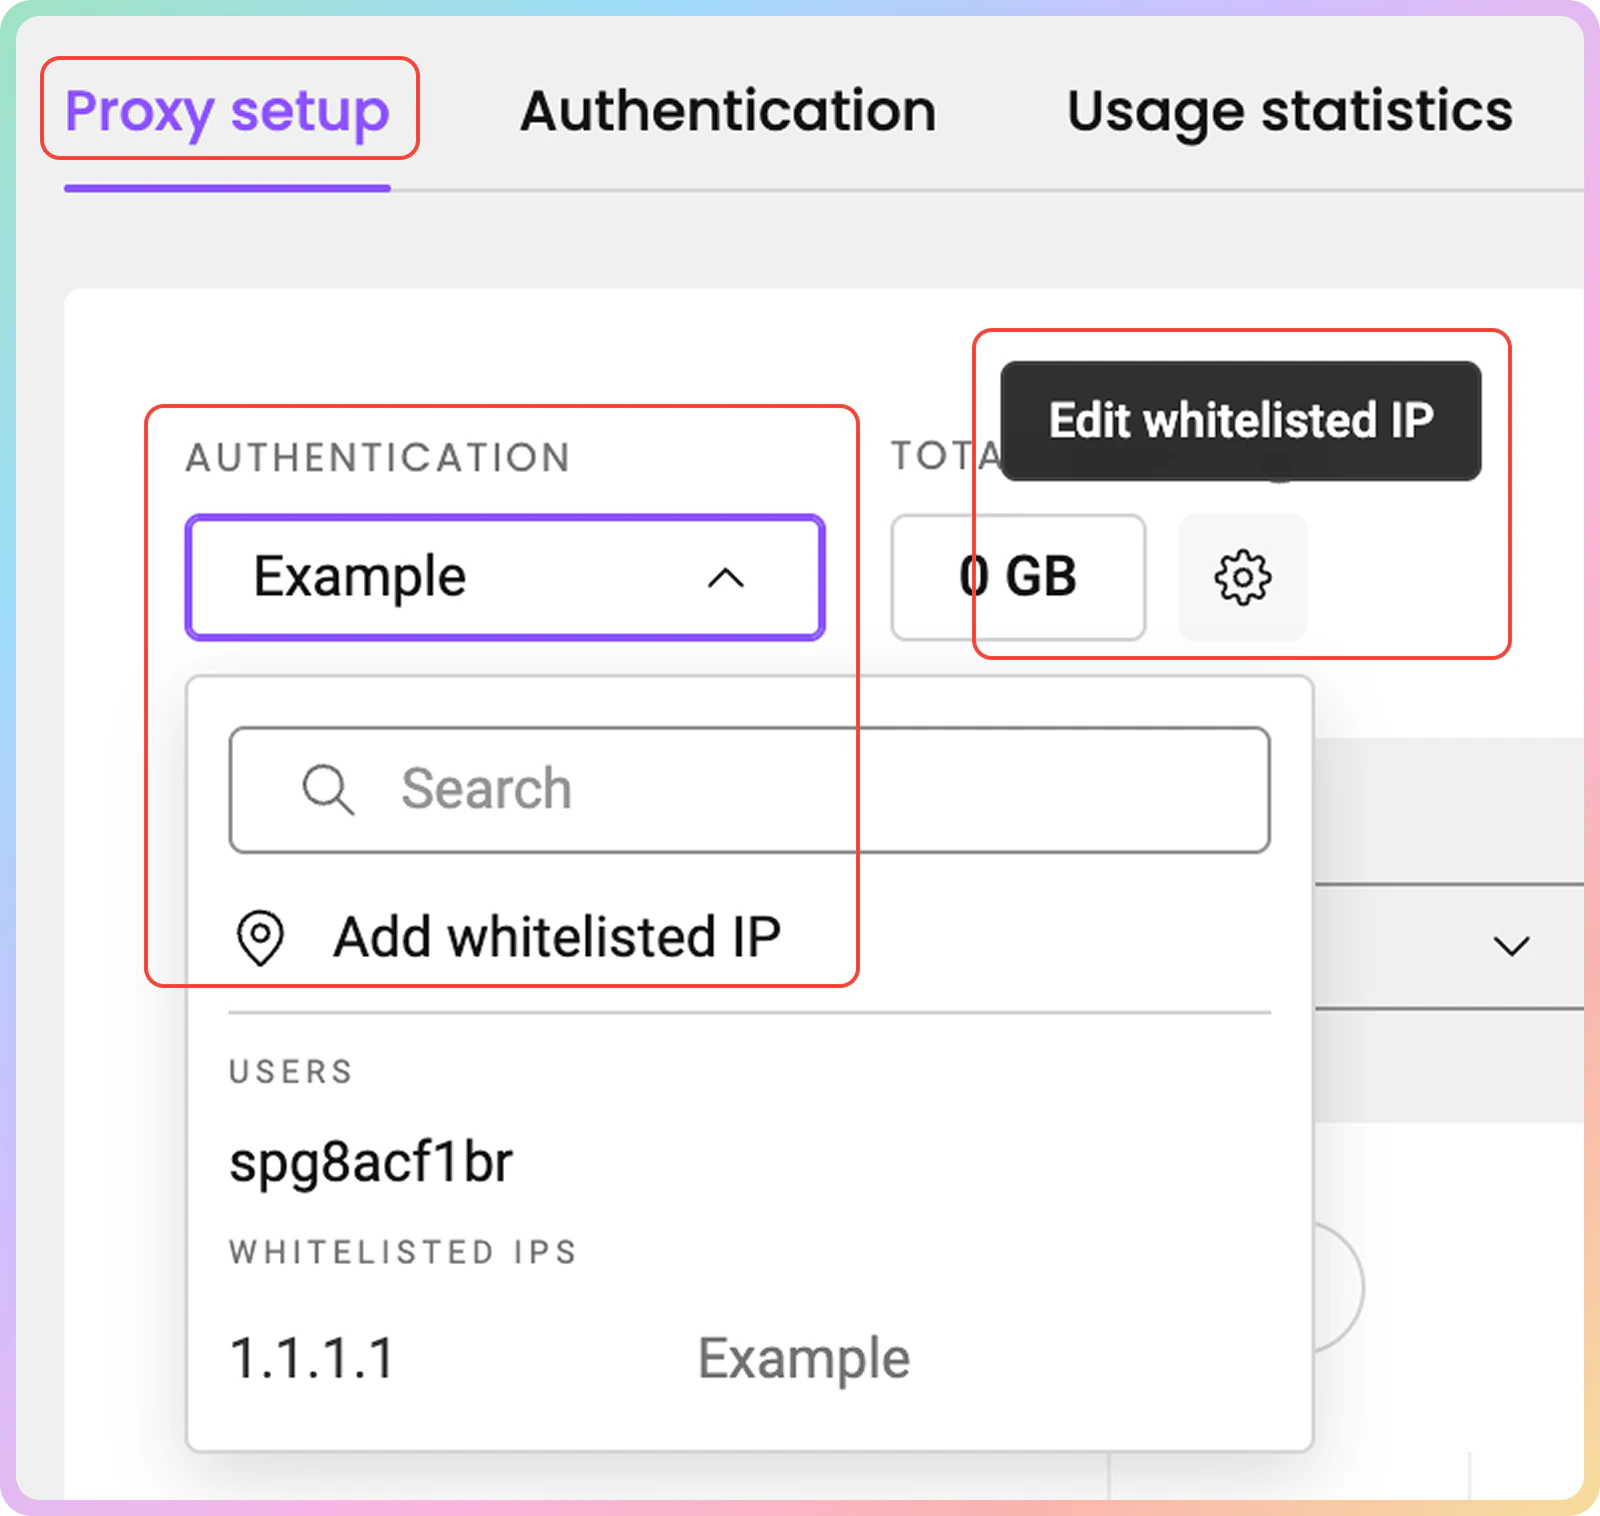
* Alternatively, you can **add** or **edit whitelisted IPs** directly in the [**Proxy setup**](https://dashboard.decodo.com/datacenter-ips/proxy-setup) section.
### Editing Whitelisted IPs
* To **edit** a whitelisted IP, click the **three dots**, and then **Edit IP**. A menu on the right will open.
* Alternatively, you can **add** or **edit whitelisted IPs** directly in the [**Proxy setup**](https://dashboard.decodo.com/datacenter-ips/proxy-setup) section.
 ### Naming Whitelisted IPs
* To **name** your whitelisted IP, click Edit and type in the name you want. Click **Save** to finalize.
* Leave the entry field blank to remove a name.
### Whitelisted IP Removal
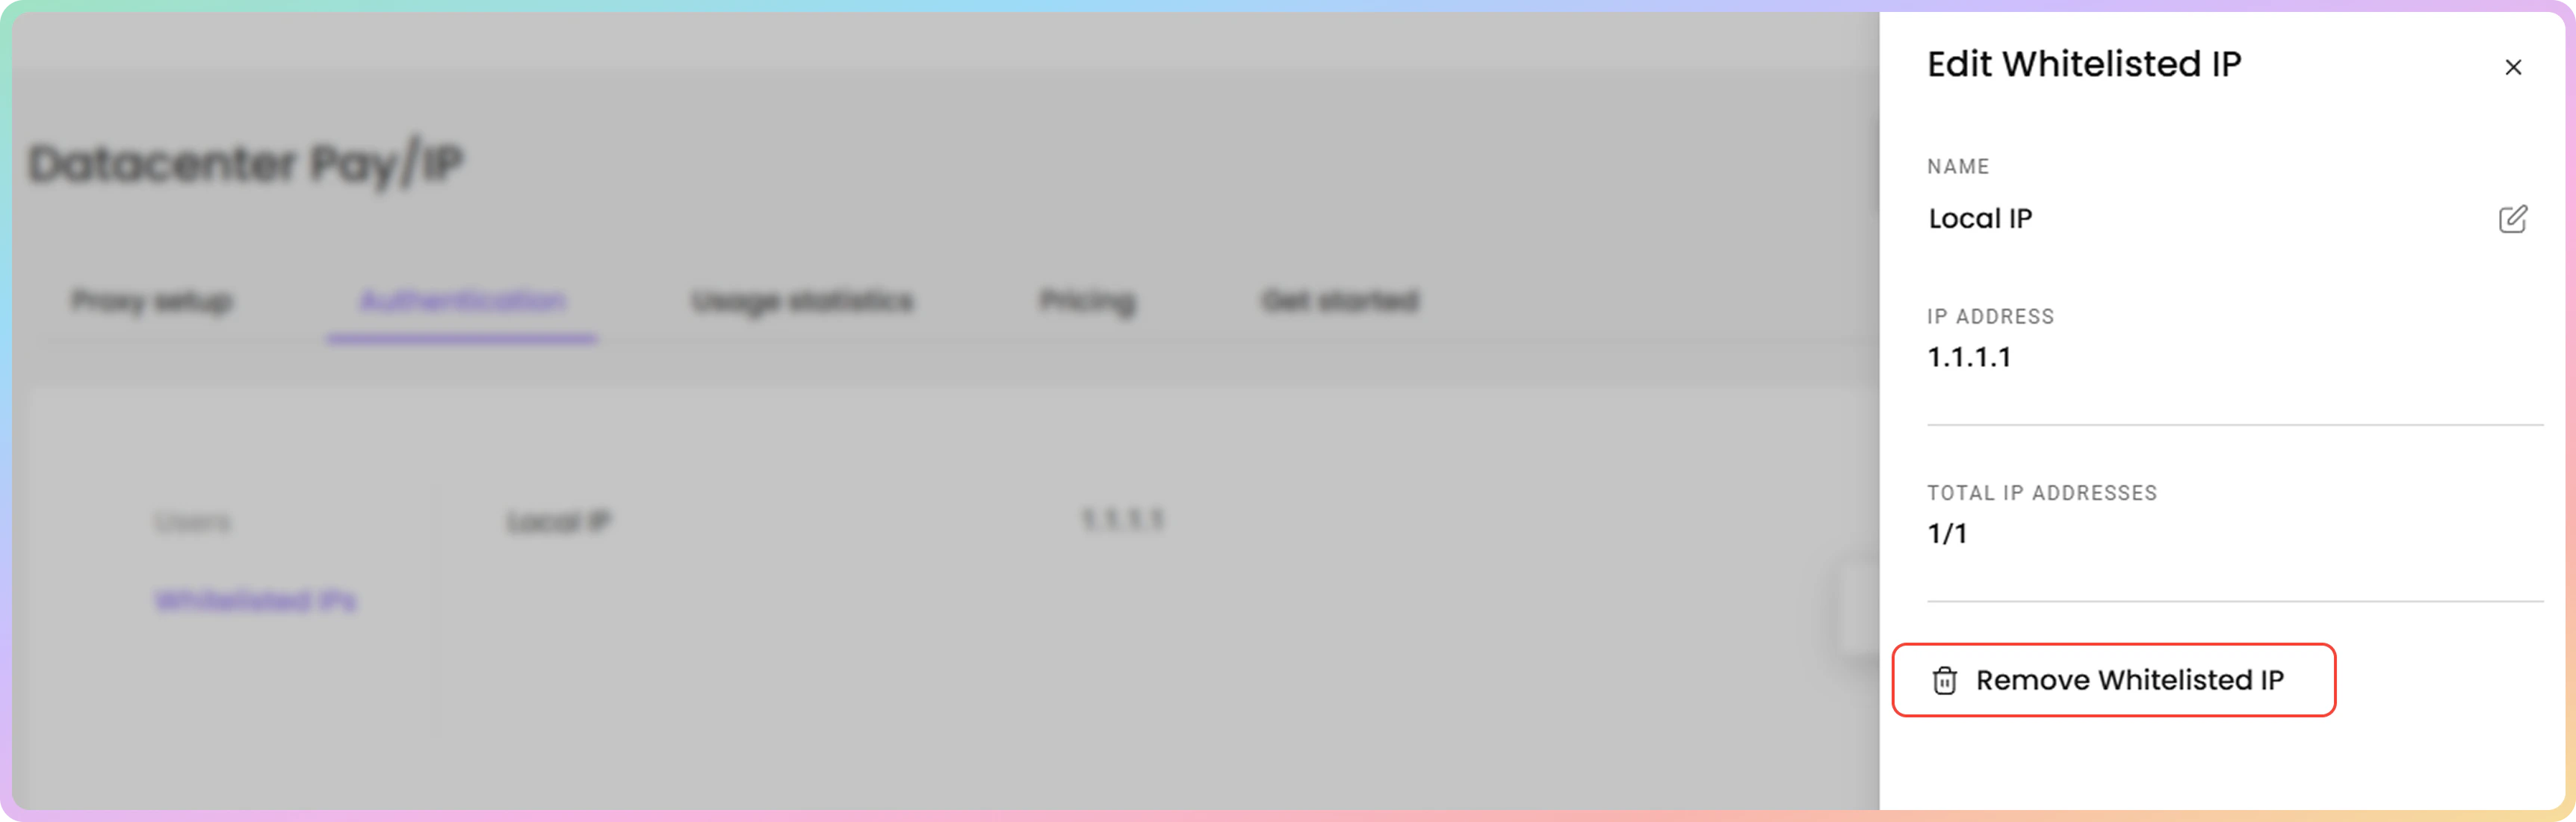
* To **remove** a whitelisted IP, click **Remove Whitelisted IP** and then **Confirm**.
### Naming Whitelisted IPs
* To **name** your whitelisted IP, click Edit and type in the name you want. Click **Save** to finalize.
* Leave the entry field blank to remove a name.
### Whitelisted IP Removal
* To **remove** a whitelisted IP, click **Remove Whitelisted IP** and then **Confirm**.
 If you’re using services such as **Amazon Web Services**, we highly recommend using the traditional `username:password` authentication instead.
***
Need help or just want to say hello? Our support is available 24/7. \
You can also reach us anytime via email at [support@decodo.com](mailto:support@decodo.com).
Can't find what you're looking for? Request an article! \
Have feedback? Share your thoughts on how we can improve.
If you’re using services such as **Amazon Web Services**, we highly recommend using the traditional `username:password` authentication instead.
***
Need help or just want to say hello? Our support is available 24/7. \
You can also reach us anytime via email at [support@decodo.com](mailto:support@decodo.com).
Can't find what you're looking for? Request an article! \
Have feedback? Share your thoughts on how we can improve.